
Issue #742
Auto Layout has been around since macOS 10.7 and iOS 6.0 as a nicer way to do layouts over the old resizing masks. Besides some rare cases when we need to manually specify origins and sizes, Auto Layout is the preferred way to do declarative layouts whether we choose to do UI in code or Storyboard. The Auto Layout APIs have some improvements over the years, there are also some sugar libraries that add easy syntaxes, so more choices for developers.
In this article, let’s take a review of how layout has improved over the years, from manual layout, autoresizing masks and finally to Auto Layout. I will mention a few takes on some libraries and how to abstract Auto Layout using the builder pattern. There are also some notes about the view life cycle and APIs improvements that might be overlooked. These are of course based on my experience and varies because of personal tastes but I hope you‘ll find something useful.
Although the article mention iOS, the same learning applies to watchOS, tvOS and macOS too.
Positioning a view before Auto Layout
When I first started iOS programming in early 2014, I read a book about Auto Layout and that book detailed lots of scenarios that completely confused me. It didn’t take long until I tried Auto Layout in an app and I realized it w as so simple. In its simplest sense, a view needs a position and a size to be correctly shown on the screen, everything else is just extra. In Auto Layout’s term, we need to specify enough constraints to position and size the view.
Manual layout using CGRect
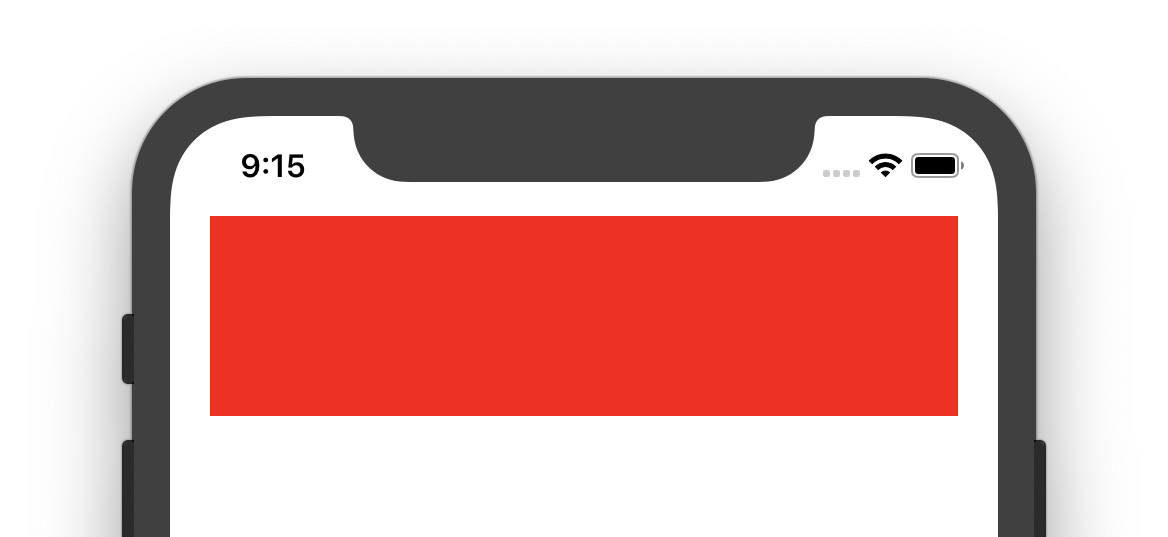
If we take a look back at the way we do a manual layout with the frame, there are origins and sizes. For example, here is how to position a red box that stretches accordingly with the width of the view controller.
class ViewController: UIViewController {

    let box = UIView()
    override func viewDidLoad() {
        super.viewDidLoad()

        box.backgroundColor = UIColor.red
        view.addSubview(box)
    }

    override func viewDidLayoutSubviews() {
        super.viewDidLayoutSubviews()

        box.frame = CGRect(x: 20, y: 50, width: view.frame.size.width - 40, height: 100)
    }
}
viewDidLoad is called when the view property of view controller is loaded, we need to wait until viewDidLayoutSubviews so that we have access to the final bounds. When the bounds change for a view controller’s view, the view adjusts the positions of its subviews and then the system calls this method.
Why is view size correct in viewDidLoad
viewDidLoad is definitely not the recommended way to do manual layout but there are times we still see that its view is correctly sized and fills the screen. This is when we need to read View Management in UIViewController more thoroughly:
Each view controller manages a view hierarchy, the root view of which is stored in the *view*property of this class. The root view acts primarily as a container for the rest of the view hierarchy. The size and position of the root view is determined by the object that owns it, which is either a parent view controller or the app’s window. The view controller that is owned by the window is the app’s root view controller and its view is sized to fill the window. A view controller’s root view is always sized to fit its assigned space.
It can also be that the view has fixed size in xib or storyboard but we should control the size explicitly and do that in the right view controller method to avoid unexpected behaviors.
Autoresizing masks

Autoresizing mask was the old way to make layout a bit more declarative, also called springs and struts layout system. It is integer bit mask that determines how the receiver resizes itself when its superview’s bounds change. Combining these constants lets you specify which dimensions of the view should grow or shrink relative to the superview. The default value of this property is none, which indicates that the view should not be resized at all.
While we can specify which edges we want to fix and which should be flexible, it is confusing in the ways we do in xib and in code.
In the above screenshot, we pin the top of the red box to the top of the screen, and that is fixed distance. When the view changes size, the width and height of the red box changes proportionally, but the top spacing remains fixed.
In code, instead of specifying autoresizing in terms of fixed distance, we use flexible terms to specify which edges should be flexible.
To achieve the same red box on the top of the screen, we need to specify a flexible width and a flexible bottom margin. This means the left, right and top edges are fixed.
box.autoresizingMask = [.flexibleWidth, .flexibleBottomMargin]
Here are a few more scenarios
-
Horizontally fixed distance from the left: [.flexibleRightMargin]
-
Center horizontally [.flexibleLeftMargin, .flexibleRightMargin]
-
Vertically fixed distance from the top: [.flexibleBottomMargin]
-
Center vertically [.flexibleTopMargin, .flexibleBottomMargin]
These are not very intuitive and the way these are scaled proportionally may not fit our expectation. Also, note that multiple options can be done on the same axis.
When more than one option along the same axis is set, the default behavior is to distribute the size difference proportionally among the flexible portions. The larger the flexible portion, relative to the other flexible portions, the more it is likely to grow. For example, suppose this property includes the flexibleWidth and flexibleRightMarginconstants but does not include the flexibleLeftMargin constant, thus indicating that the width of the view’s left margin is fixed but that the view’s width and right margin may change.
Understanding of autoresizing masks won’t waste your time, we will come back to it in a few minutes 😉
Auto Layout to the rescue
Auto Layout, together with dynamic text and size classes, are recommended ways to build adaptive user interfaces as there the number of iOS devices with different screen sizes grows.
A constraint-based layout system
Auto Layout is described via NSLayoutConstraint by defining constraints between 2 objects. Here is the simple formula to remember:
item1.attribute1 = multiplier × item2.attribute2 + constant
Here is how to replicate that red box with NSLayoutConstraint. We need to specify which property of which view should be connected to another property of another view. Auto Layout supports many attributes such ascenterX, centerY and topMargin.
let marginTop = NSLayoutConstraint(item: box, attribute: .top, relatedBy: .equal, toItem: view, attribute: .top, multiplier: 1.0, constant: 50)
let marginLeft = NSLayoutConstraint(item: box, attribute: .left, relatedBy: .equal, toItem: view, attribute: .left, multiplier: 1.0, constant: 20)
let marginRight = NSLayoutConstraint(item: box, attribute: .right, relatedBy: .equal, toItem: view, attribute: .right, multiplier: 1.0, constant: -20)
let height = NSLayoutConstraint(item: box, attribute: .height, relatedBy: .equal, toItem: nil, attribute: .notAnAttribute, multiplier: 1.0, constant: 100)
NSLayoutConstraint.activate([marginTop, marginLeft, marginRight, height])
translatesAutoresizingMaskIntoConstraints
If we run the above code, we will get into the popular warning message regarding translatesAutoresizingMaskIntoConstraints
[LayoutConstraints] Unable to simultaneously satisfy constraints.
 Probably at least one of the constraints in the following list is one you don't want.
 Try this:
  (1) look at each constraint and try to figure out which you don't expect;
  (2) find the code that added the unwanted constraint or constraints and fix it.
 (Note: If you're seeing NSAutoresizingMaskLayoutConstraints that you don't understand, refer to the documentation for the UIView property translatesAutoresizingMaskIntoConstraints)
(
    "<NSAutoresizingMaskLayoutConstraint:0x600003ef2300 h=--& v=--& UIView:0x7fb66c5059f0.midX == 0   (active)>",
    "<NSLayoutConstraint:0x600003e94b90 H:|-(20)-[UIView:0x7fb66c5059f0](LTR)   (active, names: '|':UIView:0x7fb66c50bce0 )>"
)
If you need some help deciphering this, there is wtfautolayout that does a good job on explaining what’s really happening.
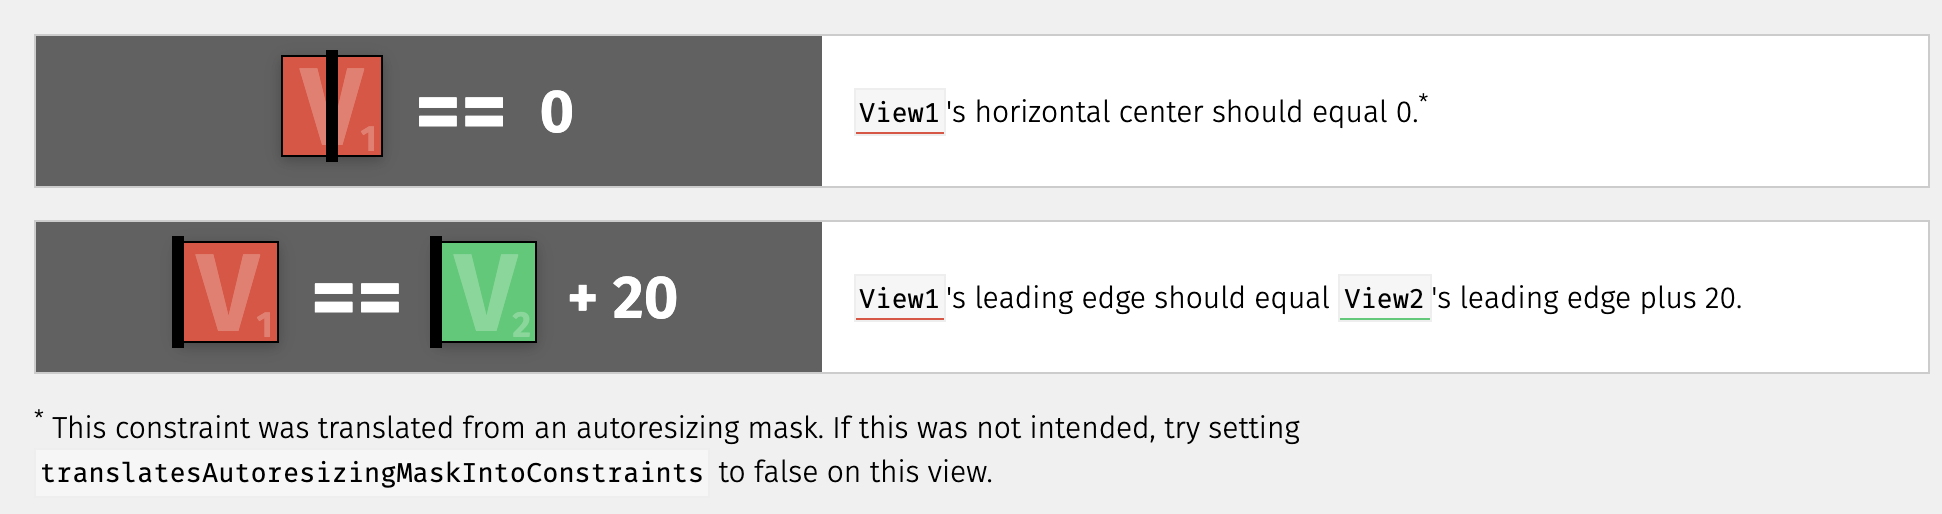
It is said that resizing masks has been reimplemented using Auto Layout under the hood, and there is always NSAutoresizingMaskLayoutConstraint added to the view, hence the midX constraint.
We should never mix resizing masks and Auto Layout to avoid unwanted behavior, the fix is simply to disable translatesAutoresizingMaskIntoConstraints
box.translatesAutoresizingMaskIntoConstraints = false
This property is false by default for views from xib or storyboard but holds true if we declare layout in code. The intention is for the system to create a set of constraints that duplicate the behavior specified by the view’s autoresizing mask. This also lets you modify the view’s size and location using the view’s frame, bounds, or center properties, allowing you to create a static, frame-based layout within Auto Layout.
Visual Format Language
The Visual Format Language lets you use ASCII-art like strings to define your constraints. I see it is used in some code bases so it’s good to know it.
Here is how to recreate the red box using VFL. We need to specify constraints for both horizontal and vertical direction. Note that the same format string may result in multiple constraints:
let views = ["box" : box]
let horizontal = "H:|-20-[box]-20-|"
let vertical = "V:|-50-[box(100)]"
let horizontalConstraints = NSLayoutConstraint.constraints(withVisualFormat: horioptions: [], metrics: nil, views: views)
let verticalConstraints = NSLayoutConstraint.constraints(withVisualFormat: veoptions: [], metrics: nil, views: views)
NSLayoutConstraint.activate([horizontalConstraints, verticalConstraints].flatMap({ $0 }))
Visual Format Language is a bit nicer than the verbose NSLayoutConstraint initializer, but it encourages string format, which is error-prone.
addConstraint and activate
This may seem trivial but I see in modern code bases, there is still usage of addConstraint . This was old and hard to use, as we must find the nearest common ancestor view of the 2 views that envolve in Auto Layout.
Starting from iOS 8, there is isActive and the static activate functions that ease this adding constraints process a lot. Basically what it does is to activate or deactivate the constraint with calls toaddConstraint(_:) and removeConstraint(_:) on the view that is the closest common ancestor of the items managed by this constraint.
NSLayoutAnchor
Starting with macOS 10.11 and iOS 9, there was NSLayoutAnchor that simplifies Auto Layout a lot. Auto Layout was declarative, but a bit verbose, now it is simpler than ever with an anchoring system.
Here is how to achieve that same red box
NSLayoutConstraint.activate([
    box.topAnchor.constraint(equalTo: view.topAnchor, constant: 50),
    box.leftAnchor.constraint(equalTo: view.leftAnchor, constant: 20),
    box.rightAnchor.constraint(equalTo: view.rightAnchor, constant: -20),
    box.heightAnchor.constraint(equalToConstant: 100)
])
The cool thing about NSLayoutAnchor is its generic constrained API design. Constraints are divided into X-axis, Y-axis and dimension anchor type that makes it hard to make mistakes.
open class NSLayoutXAxisAnchor : NSLayoutAnchor<NSLayoutXAxisAnchor>
open class NSLayoutDimension : NSLayoutAnchor<NSLayoutDimension>
For example, we can’t pin the top anchor to the left anchor as they are in different axis, and it makes no sense. Attempt to do the following results in compilation issue as Swift strong type system ensures correctness.
box.topAnchor.constraint(equalTo: view.leftAnchor, constant: 50),
Ambiguous error message with NSLayoutAnchor
I’ve gone into a few cases where the error messages from NSLayoutAnchor don’t help. If we mistakenly connect topAnchor with centerXAnchor, which are not possible as they are from different axes.
NSLayoutConstraint.activate([
    box.topAnchor.constraint(equalTo: view.centerXAnchor, constant: 50)
])
Xcode complains of unwrapped UIView problem which may confuse us even more.
Value of optional type 'UIView?' must be unwrapped to refer to member 'centerXAnchor' of wrapped base type 'UIView'
Another puzzle, regarding this code
NSLayoutConstraint.activate([
    imageView.centerYAnchor.constraint(equalTo: view.centerYAnchor),
    imageView.leftAnchor.constraint(equalTo: view.leftAnchor, constant: 8),
    imageView.heightAnchor.constraint(equalToConstant: view.heightAnchor, mult0.7),
    imageView.widthAnchor.constraint(equalTo: imageView.heightAnchor, multiplier: 1.0)
])
Xcode is complaining about ‘Int’ is not convertible to ‘CGFloat’ which is very misleading. Can you spot the error?
The problem is that we are using equalToConstant , not equalTo . The generic constraints of NSLayoutAnchor is giving us misleading errors and can waste lots of time of us trying to figure out the subtle typos.
Abstractions over Auto Layout
NSLayoutAnchor is getting more popular now but it is not without any flaws. Depending on personal taste, there might be some other forms of abstractions over Auto Layout, namely Cartography and SnapKit, which I ‘ve used and loved. Here are a few of my takes on those.
Cartography
Cartography is one of the most popular ways to do Auto Layout in iOS. It uses operators which makes constraints very clear:
constrain(button1, button2) { button1, button2 in
    button1.right == button2.left - 12
}
What I don’t like about Cartography is that we have to repeat parameter names and that the parameters inside closure are just proxies, not real views and there is a limit on the number of constrain items.
Another huge con was that long compilation time issue due to excessive use of operators Very long compile time in large functions. Although Swift compilation time is getting better, this was a big problem. I even had to write a script to remove Cartography to use simple NSLayoutAnchor, so take a look at AutoLayoutConverter, which converts Cartography code from
constrain(logoImnageView, view1, view2) { logoImageView, view1, view2 in
    logoImageView.with == 74
    view1.left == view2.left + 20
}
to simple NSLayoutAnchor
Constraint.on(
  logoImageView.widthAnchor.constraint(equalToConstant: 74),
  view1.leftAnchor.constraint(equalTo: view2.leftAnchor, constant: 20),
)
There are always tradeoffs but to reduce compilation time at the time was a top priority.
SnapKit
SnapKit, originally Masonry, is perhaps the most popular Auto Layout wrapper
box.snp.makeConstraints { (make) -> Void in
   make.width.height.equalTo(50)
   make.center.equalTo(self.view)
}
The syntax is nice and with snp namespace to avoid extension name clashes, which I love.
The thing I don’t like about SnapKit is that limited closure. We can only work on 1 view at a time, and the make inside closure is just a proxy, which does not seem intuitive.
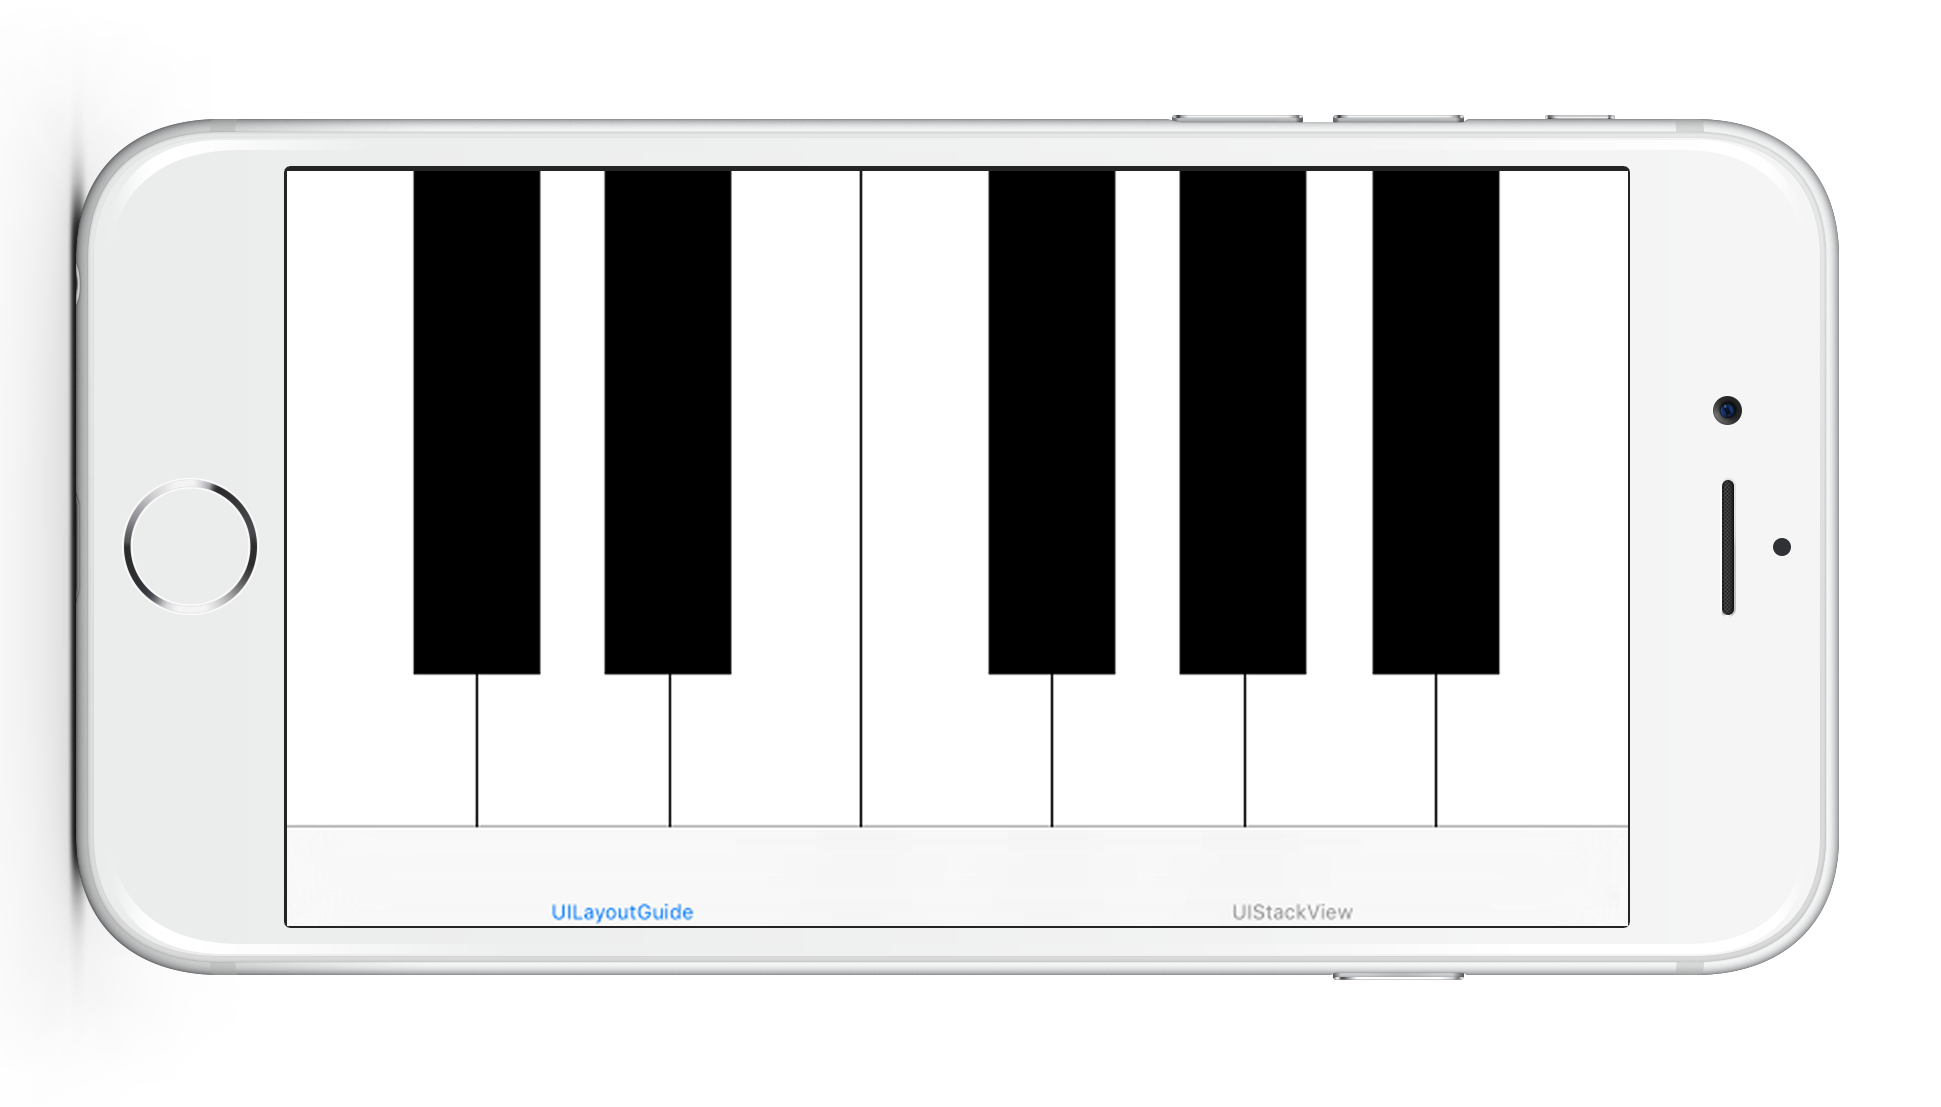
Imagine if we’re gonna make paging views or piano, where each view is stacked side by side. We need a lot of SnapKit calls as we can only work on 1 view at a time. Also, there is no clear relationship where we connect with the other view.
 https://github.com/onmyway133/blog/issues/22
keyB.snp.makeConstraints { (make) -> Void in
   make.left.equalTo(self.keyA.right)
}

keyC.snp.makeConstraints { (make) -> Void in
   make.left.equalTo(self.keyB.right)
}

keyD.snp.makeConstraints { (make) -> Void in
   make.left.equalTo(self.keyC.right)
}
The many overloading functions
There are also attempts to build simple Auto Layout wrapper functions but that escalates very quickly.
We might begin with an extension that pins edge constraints to superview.
box.pinEdgesToSuperview()
But a view does not always pin to its superview, it can be to another view, then we add another function
box.pinEdgesToView(_ view: UIView)
It would be nice if there is some padding, isn’t it? Let’s add insets options
box.pinEdgesToView(_ view: UIView, insets: UIEdgeInsets)
There might be cases where we only want to pin top, left, and right and not the bottom, let’s add another parameter
box.pinEdgesToView(_ view: UIView, insets: UIEdgeInsets, exclude: NSLayoutConstraint.Attribute)
Constraints are not always 1000 priorities, it can be lower. We need to support that
box.pinEdgesToView(_ view: UIView, insets: UIEdgeInsets, exclude: NSLayoutConstraint.Attribute, priority: NSLayoutConstraint.Priority)
We might exclude more than one properties or set different priority levels for each constraint. The simple wrapper with overloading functions and default parameters are just like building rigid abstraction based on premature assumptions. This just limits us in the long run and not scalable 😢
Embracing Auto Layout
All the Auto Layout frameworks out there are just convenient ways to build NSLayoutConstraint, in fact, these are what you normally need
-
Call addSubview so that view is in the hierarchy
-
Set translatesAutoresizingMaskIntoConstraints = false
-
Set isActive = true to enable constraints
Here is how to make an extension on NSLayoutConstraint that disables translatesAutoresizingMaskIntoConstraints for the involved views. Code is from Omnia
public extension NSLayoutConstraint {

    /// Disable auto resizing mask and activate constraints
    ///
    /// - Parameter constraints: constraints to activate
    static func on(_ constraints: [NSLayoutConstraint]) {
        constraints.forEach {
            ($0.firstItem as? UIView)?.translatesAutoresizingMaskIntoConstraints = false
            $0.isActive = true
        }
    }

    static func on(_ constraintsArray: [[NSLayoutConstraint]]) {
        let constraints = constraintsArray.flatMap({ $0 })
        NSLayoutConstraint.on(constraints)
    }
}
Here before we activate constraints, we find the firstItem then disables translatesAutoresizingMaskIntoConstraints. From Swift 4.2 there is a separation between compactMap and flatMap so we can safely use flatMap to flatten an array of arrays. This is useful when we have an array of arrays of constraints.
public extension UIView {
    func pinCenter(view: UIView) -> [NSLayoutConstraint] {
        return [
            centerXAnchor.constraint(equalTo: view.centerXAnchor),
            centerYAnchor.constraint(equalTo: view.centerYAnchor)
        ]
    }

    func pin(size: CGSize) -> [NSLayoutConstraint] {
        return [
            widthAnchor.constraint(equalToConstant: size.width),
            heightAnchor.constraint(equalToConstant: size.height)
        ]
    }
}
With that, we can pin the red box with a certain size and to the center of the screen:
NSLayoutConstraint.on([
    box.pinCenter(view: view),
    box.pin(size: CGSize(width: 100, height: 50))
])
This is a very thin but powerful wrapper over NSLayoutAnchor and we can expand it the way we need. It sadly has some problems, like we can’t easily change the priority, as we have to reference the constraint 😢
let topConstraint = box.topAnchor.constraint(equalTo: view.topAnchor, constant: 50)
topConstraint.priority = UILayoutPriority.defaultLow

NSLayoutConstraint.on([
    topConstraint
])
Making Auto Layout more convenient with the builder pattern
The above extension on NSLayoutConstraint works well. However, if you’re like me who wants even more declarative and fast Auto Layout code, we can use the builder pattern to make Auto Layout even nicer. The builder pattern can be applied to many parts of the code but I find it very well suited for Auto Layout. The final code is Anchors on GitHub, and I will detail how to make it.
Here is what we want to achieve to quickly position 4 views:

activate(
  boxA.anchor.top.left,
  boxB.anchor.top.right,
  boxC.anchor.bottom.left,
  boxD.anchor.bottom.right
)
Most of the times, we want to anchor to parent view, so that should be implicitly done for us. I like to have anchor namespace to avoid extension naming clashes and to make it the starting point for all our convenient Auto Layout code. Let’s identify a few core concepts
Which objects can interact with Auto Layout?
Currently, there are 3 types of objects that can interact withAuto Layout
-
UIView
-
UILayoutSupport, from iOS 7, for UIViewController to get bottomLayoutGuide and topLayoutGuide . In iOS 11, we should use safeAreaLayoutGuide from UIView instead
-
UILayoutGuide: using invisible UIView to do Auto Layout is expensive, that’s why Apple introduced layout guides in iOS 9 to help.
So to support these 3 with anchor namespace, we can make Anchor object that holds AnyObject as behind the scene, NSLayoutConstraint works with AnyObject:
public class Anchor: ConstraintProducer {
  let item: AnyObject

/// Init with View
  convenience init(view: View) {
    self.init(item: view)
  }

/// Init with Layout Guide
  convenience init(layoutGuide: LayoutGuide) {
    self.init(item: layoutGuide)
  }

// Init with Item
  public init(item: AnyObject) {
    self.item = item
  }
}
Now we can define anchor property
public extension View {
  var anchor: Anchor {
    return Anchor(view: self)
  }
}

public extension LayoutGuide {
  var anchor: Anchor {
    return Anchor(layoutGuide: self)
  }
}
Which properties are needed in a layout constraint?
The builder patterns make building things declaratively by holding temporary values. Besides from, to, priority, identifier, we need an array of pins to handle cases where there are multiple created constraints. A center constraint results in both centerX and centerY constraints, and an edge constraint results in top, left, bottom and right constraints.
enum To {
    case anchor(Anchor)
    case size
    case none
  }
class Pin {
  let attribute: Attribute
  var constant: CGFloa
  init(_ attribute:  Attribute, constant: CGFloat = 0) {
    self.attribute = attribute
    self.constant = constant
  }
let item: AnyObject
// key: attribute
// value: constant
var pins: [Pin] = [
var multiplierValue: CGFloat = 1
var priorityValue: Float?
var identifierValue: String?
var referenceBlock: (([NSLayoutConstraint]) -> Void)?
var relationValue: Relation = .equal
var toValue: To = .none
With this, we can also expand our convenient anchor to support more constraints, like spacing horizontally, which adds left and right constraints with correct constants. Because as you know, in Auto Layout, for right and bottom direction, we need to use negative values:
func paddingHorizontally(_ value: CGFloat) -> Anchor {
  removeIfAny(.leading)
  removeIfAny(.trailing
  pins.append(Pin(.leading, constant: value))
  pins.append(Pin(.trailing, constant: -value)
  return self
}
Inferring constraints
There are times we want to infer constraints, like if we want a view’s height to double its width. Since we already have width, declaring ratio should pair the height to the width.
box.anchor.width.constant(10)
box.anchor.height.ratio(2) // height==width*2
This is easily achieved by checking our pins array
if sourceAnchor.exists(.width) {
  return Anchor(item: sourceAnchor.item).width
    .equal
    .to(Anchor(item: sourceAnchor.item).height)
    .multiplier(ratio).constraints()
} else if sourceAnchor.exists(.height) {
  return Anchor(item: sourceAnchor.item).height
    .equal
    .to(Anchor(item: sourceAnchor.item).width)
    .multiplier(ratio).constraints()
} else {
  return []
}
Retrieving a constraint
I see we’re used to storing constraint property in order to change its constant later. The constraints property in UIView has enough info and it is the source of truth, so retrieving constraint from that is more preferable.
Here‘s how we find constraint and update that
boxA.anchor.find(.height)?.constant = 100

// later
boxB.anchor.find(.height)?.constant = 100

// later
boxC.anchor.find(.height)?.constant = 100
The code to find constraint is very straightforward.
public extension Anchor {
/// Find a constraint based on an attribute
  func find(_ attribute: Attribute) -> NSLayoutConstraint? {
    guard let view = item as? View else {
      return nil
    }
    var constraints = view.superview?.constraints
    if attribute == .width || attribute == .height {
      constraints?.append(contentsOf: view.constraints)
    }
    return constraints?.filter({
      guard $0.firstAttribute == attribute else {
        return false
      }
    guard $0.firstItem as? NSObject == view else {
        return false
      }
      return true
    }).first
  }
}
How to reset constraints
One of the patterns I see all over is resetting constraints in UITableViewCell or UICollectionViewCell. Depending on the state, the cell removes certain constraints and add new constraints. Cartography does this well by using group.
constrain(view, replace: group) { view in
    view.top  == view.superview!.top
    view.left == view.superview!.left
}
If we think about it, NSLayoutConstraint is just layout instructions. It can be activated or deactivated . So if we can group constraints, we can activate or deactivate them as a whole.
Here is how to declare 4 groups of constraints, the syntax is from Anchors but this applies to NSLayoutAnchor as well since those generateNSLayoutConstraint under the hood.
let g1 = group(box.anchor.top.left)
let g2 = group(box.anchor.top.right)
let g3 = group(box.anchor.bottom.right)
let g4 = group(box.anchor.bottom.left)
Where to go from here
In this article, we step a bit in time into manual layout, autoresizing masks and then to the modern Auto Layout. The Auto Layout APIs have improvements over the years and are recommended way to do layout. Learning declarative layout also helps me a lot when I learn Constraint Layout in Android, flexbox in React Native or the widget layout in Flutter.
The post goes through the detailed implementation of how we can build more convenient Auto Layout like Anchors with the builder pattern. In the next article, let’s explore the many ways to debug Auto Layout and how to correctly do Auto Layout for different screen sizes.
In the meantime, let’s play Tetris in Auto Layout, because why not 😉
 https://github.com/onmyway133/Anchors
activate(
  lineBlock.anchor.left.bottom
)

// later
activate(
  firstSquareBlock.anchor.left.equal.to(lineBlock.anchor.right),
  firstSquareBlock.anchor.bottom
)

// later
activate(
  secondSquareBlock.anchor.right.bottom
)
Read more
- I originally published on Medium https://medium.com/flawless-app-stories/how-to-make-auto-layout-more-convenient-in-ios-df3b42fed37f
Start the conversation