
Issue #271
Original post https://hackernoon.com/how-to-make-tag-selection-view-in-react-native-b6f8b0adc891
Besides React style programming, Yoga is another cool feature of React Native. It is a cross-platform layout engine which implements Flexbox so we use the same layout code for both platforms.
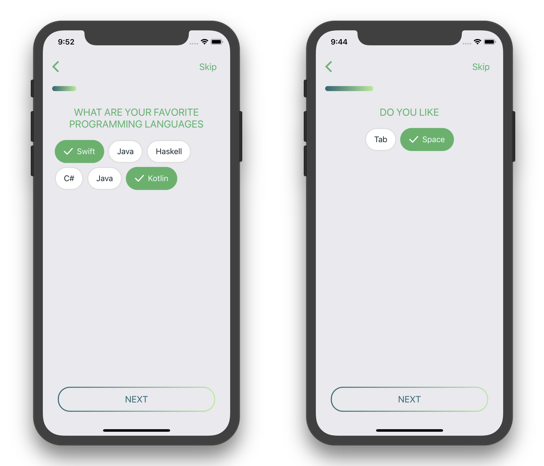
As someone who uses Auto Layout in iOS and Constraint Layout in Android, I find Flexbox bit hard to use at first, but there are many tasks that Flexbox does very well, they are distribute elements in space and flow layout. In this post we will use Flexbox to build a tag selection view using just Javascript code. This is very easy to do so we don’t need to install extra dependencies.
Our tag view will support both multiple selection and exclusive selection. First, we need a custom Button .
Button with Background
Button is of the basic elements in React Native, but it is somewhat limited if we want to have custom content inside the button, for example texts, images and background
import { Button } from 'react-native'
...

<Button
  onPress={onPressLearnMore}
  title="Learn More"
  color="#841584"
  accessibilityLabel="Learn more about this purple button"
/>
TouchableOpacity
Luckily we have TouchableOpacity, which is a wrapper for making views respond properly to touches. On press down, the opacity of the wrapped view is decreased, dimming it.
To implement button in our tag view, we need to a button with background a check image. Create a file called BackgroundButton.js
import React from 'react'
import { TouchableOpacity, View, Text, StyleSheet, Image } from 'react-native'
import R from 'res/R'

export default class BackgroundButton extends React.Component {
  render() {
    const styles = this.makeStyles()
    return (
      <TouchableOpacity style={styles.touchable} onPress={this.props.onPress}>
        <View style={styles.view}>
          {this.makeImageIfAny(styles)}
          <Text style={styles.text}>{this.props.title}</Text>
        </View>
      </TouchableOpacity>
    )
  }

makeImageIfAny(styles) {
    if (this.props.showImage) {
      return <Image style={styles.image} source={R.images.check} />
    }
  }

makeStyles() {
    return StyleSheet.create({
      view: {
        flexDirection: 'row',
        borderRadius: 23,
        borderColor: this.props.borderColor,
        borderWidth: 2,
        backgroundColor: this.props.backgroundColor,
        height: 46,
        alignItems: 'center',
        justifyContent: 'center',
        paddingLeft: 16,
        paddingRight: 16
      },
      touchable: {
        marginLeft: 4,
        marginRight: 4,
        marginBottom: 8
      },
      image: {
        marginRight: 8
      },
      text: {
        fontSize: 18,
        textAlign: 'center',
        color: this.props.textColor,
        fontSize: 16
      }
    })
  }
}
Dynamic styles
Normally we use const styles = StyleSheet.create({}) but since we want our button to be configurable, we make styles into a function, so on every render we get a new styles with proper configurations. The properties we support are borderColor, textColor, backgroundColor and showImage
In the makeImageIfAny we only need to return Image if the view is selected. We don’t have the else case, so in if showImage is false, this returns undefined and React won’t render any element
makeImageIfAny(styles) {
  if (this.props.showImage) {
    return <Image style={styles.image} source={R.images.check} />
  }
}
padding and margin
To understand padding and margin, visit CSS Box Model. Basically padding means clearing an area around the content and padding is transparent, while margin means clearing an area outside the border and the margin also is transparent.

Pay attention to styles . We have margin for touchable so that each tag button have a little margin outside each other.
touchable: {
  marginLeft: 4,
  marginRight: 4,
  marginBottom: 8
}
In the view we need flexDirection as row because React Native has flexDirection as column by default. And a row means we have Image and Text side by side horizontally inside the button. We also use alignItems and justifyContent to align elements centeredly on both main and cross axises. The padding is used to have some spaces between the inner text and the view.
view: {
  flexDirection: 'row',
  height: 46,
  alignItems: 'center',
  justifyContent: 'center',
  paddingLeft: 16,
  paddingRight: 16
}
Tag View
Create a file called TagsView.js This is where we parse tags and show a bunch of BackgroundButton
import React from 'react'
import { View, StyleSheet, Button } from 'react-native'
import R from 'res/R'
import BackgroundButton from 'library/components/BackgroundButton'
import addOrRemove from 'library/utils/addOrRemove'

export default class TagsView extends React.Component {
  constructor(props) {
    super(props)
    this.state = {
      selected: props.selected
    }
  }

render() {
    return (
      <View style={styles.container}>
        {this.makeButtons()}
      </View>
    )
  }

onPress = (tag) => {
    let selected
    if (this.props.isExclusive) {
      selected = [tag]
    } else {
      selected = addOrRemove(this.state.selected, tag)
    }

this.setState({
      selected
    })
  }

makeButtons() {
    return this.props.all.map((tag, i) => {
      const on = this.state.selected.includes(tag)
      const backgroundColor = on ? R.colors.on.backgroundColor : R.colors.off.backgroundColor
      const textColor = on ? R.colors.on.text : R.colors.off.text
      const borderColor = on ? R.colors.on.border : R.colors.off.border

return (
        <BackgroundButton
          backgroundColor={backgroundColor}
          textColor={textColor}
          borderColor={borderColor}
          onPress={() => {
            this.onPress(tag)
          }}
          key={i}
          showImage={on}
          title={tag} />
      )
    })
  }
}

const styles = StyleSheet.create({
  container: {
    flex: 1,
    flexDirection: 'row',
    flexWrap: 'wrap',
    padding: 20
  }
})
We parse an array of tags to build BackgroundButton . We keep the selected array in state because this is mutated inside the TagsView component. If it is isExclusive then the new selected contains just the new selected tag. If it is multiple selection, then we add the new selected tag into the selected array.
The addOrRemove is a our homegrown utility function to add an item into an array if it does not exists, or remove if it exists, using the high orderfilter function.
const addOrRemove = (array, item) => {
  const exists = array.includes(item)

if (exists) {
    return array.filter((c) => { return c !== item })
  } else {
    const result = array
    result.push(item)
    return result
  }
}
Flex wrap
Pay attention to styles
const styles = StyleSheet.create({
  container: {
    flex: 1,
    flexDirection: 'row',
    flexWrap: 'wrap',
    padding: 20
  }
})
The hero here is flexWrap which specifies whether the flexible items should wrap or not. Take a look at CSS flex-wrap property for other options. Since we have main axis as row , element will be wrapped to the next row if there are not enough space. That’s how we can achieve a beautiful tag view.
Using TagsView
Then consuming TagsView is as easy as declare it inside render
const selected = ['Swift', Kotlin]
const tags = ['Swift', 'Kotlin', 'C#', 'Haskell', 'Java']

return (
  <TagsView
    all={tags}
    selected={selected}
    isExclusive={false}
  />
)
Learning Flexbox
Learning Flebox is crucial in using React and React Native effectively. The best places to learn it are w3school CSS Flexbox and Basic concepts of flexbox by Mozzila. Basic concepts of flexbox *The Flexible Box Module, usually referred to as flexbox, was designed as a one-dimensional layout model, and as a…*developer.mozilla.org
There is a showcase of all possible Flexbox properties The Full React Native Layout Cheat Sheet A simple visual guide with live examples for all major React Native layout propertiesmedium.com
Yoga has its own YogaKit published on CocoaPods, you can learn it with native code in iOS Yoga Tutorial: Using a Cross-Platform Layout Engine *Learn about Yoga, Facebook’s cross-platform layout engine that helps developers write more layout code in style akin to…*www.raywenderlich.com
And when we use flexbox, we should compose element instead of hardcoding values, for example we can use another View with justifyContent: flex-end to move a button down the screen. This follows flexbox style and prevent rigid code. Position element at the bottom of the screen using Flexbox in React Native *React Native uses Yoga to achieve Flexbox style layout, which helps us set up layout in a declarative and easy way.*medium.com
Where to go from here
I hope you learn something useful in this post. For more information please consult the official guide Layout with Flexbox and layout-props for all the possible Flexbox properties.
Start the conversation