Issue #259
React Native uses Yoga to achieve Flexbox style layout, which helps us set up layout in a declarative and easy way.
The Flexible Box Module, usually referred to as flexbox, was designed as a one-dimensional layout model, and as a method that could offer space distribution between items in an interface and powerful alignment capabilities
As someone who worked with Auto Layout in iOS and Constrain Layout in Android, I sometimes find it difficult to work with Flexbox in React Native. One of them is how to position certain element at the top or the bottom of the screen. This is the scenario when one element does not follow the rule i the container.
A traditional layout
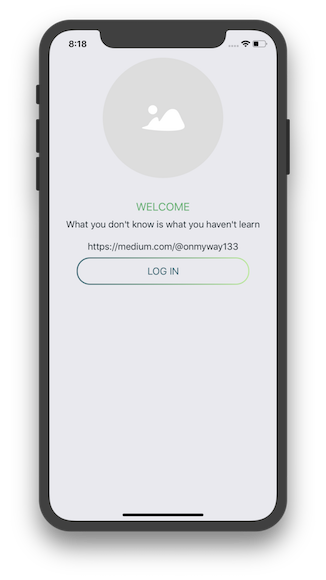
Consider this traditional welcome screen, where we have some texts and a login button.

Which is easily achieved with
import React from 'react'
import { View, StyleSheet, Image, Text, Button } from 'react-native'
import strings from 'res/strings'
import palette from 'res/palette'
import images from 'res/images'
import ImageButton from 'library/components/ImageButton'

export default class Welcome extends React.Component {
  render() {
    return (
      <View style={styles.container}>
        <Image
          style={styles.image}
          source={images.placeholder} />
        <Text style={styles.heading}>{strings.onboarding.welcome.heading.toUpperCase()}</Text>
        <Text style={styles.text}>{strings.onboarding.welcome.text1}</Text>
        <Text style={styles.text}>{strings.onboarding.welcome.text2}</Text>
        <ImageButton
          style={styles.button}
          title={strings.onboarding.welcome.button} />
      </View>
    )
  }
}

const styles = StyleSheet.create({
  container: {
    flex: 1,
    alignItems: 'center'
  },
  image: {
    marginTop: 50
  },
  heading: {
    ...palette.heading, ...{
      marginTop: 40
    }
  },
  text: {
    ...palette.text, ...{
      marginHorizontal: 8,
      marginVertical: 10
    }
  }
})
Pay attention to styles . Unlike in web, Flexbox in React Native defaults main axis to be vertical, so elements are laid out from top to bottom. alignItems makes sure all elements are centered in the horizontal axis, which is the cross axis according to Flexbox terminology.
Position button at the bottom
According to design, the button should be positioned at the bottom of the screen. A dark though might suggest us to use position: ‘absolute’ , something like
button: {
  position: 'absolute',
  bottom:0
}
It workaround could work, but it’s like opting out of Flexbox. We like Flexbox and we like to embrace it. The solution is to use add a container for the button, and use flex-end inside so that the button moves to the bottom.
Let’s add a container
<View style={styles.bottom}>
  <ImageButton
    style={styles.button}
    title={strings.onboarding.welcome.button} />
</View>
and styles
bottom: {
  flex: 1,
  justifyContent: 'flex-end',
  marginBottom: 36
}
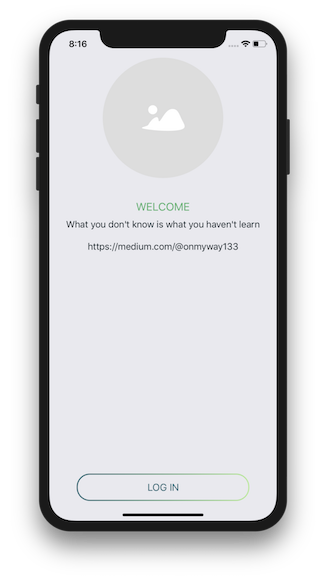
The flex tells the bottom view to take the remaining space. And inside this space, the bottom is laid out from the bottom, that’s what the flex-end means.
Here is how the result looks like

And there is the full code
import React from 'react'
import { View, StyleSheet, Image, Text, Button } from 'react-native'
import strings from 'res/strings'
import palette from 'res/palette'
import images from 'res/images'
import ImageButton from 'library/components/ImageButton'

export default class Welcome extends React.Component {
  render() {
    return (
      <View style={styles.container}>
        <Image
          style={styles.image}
          source={images.placeholder} />
        <Text style={styles.heading}>{strings.onboarding.welcome.heading.toUpperCase()}</Text>
        <Text style={styles.text}>{strings.onboarding.welcome.text1}</Text>
        <Text style={styles.text}>{strings.onboarding.welcome.text2}</Text>
        <View style={styles.bottom}>
          <ImageButton
            style={styles.button}
            title={strings.onboarding.welcome.button} />
        </View>
      </View>
    )
  }
}

const styles = StyleSheet.create({
  container: {
    flex: 1,
    alignItems: 'center'
  },
  image: {
    marginTop: 50
  },
  heading: {
    ...palette.heading, ...{
      marginTop: 40
    }
  },
  text: {
    ...palette.text, ...{
      marginHorizontal: 8,
      marginVertical: 10
    }
  },
  bottom: {
    flex: 1,
    justifyContent: 'flex-end',
    marginBottom: 36
  }
})
What is flex: 1
According to Basic concepts of flexbox
The flex CSS property specifies how a flex item will grow or shrink so as to fit the space available in its flex container. This is a shorthand property that sets flex-grow, flex-shrink, and flex-basis.
and w3
flex:
Equivalent to flex: 1 0 . Makes the flex item flexible and sets the flex basis to zero, resulting in an item that receives the specified proportion of the free space in the flex container. If all items in the flex container use this pattern, their sizes will be proportional to the specified flex factor.
In most browsers, flex: 1 equals 1 1 0 , which means flex-grow: 1, flex-shrink:1, flex-basis: 0 . The flex-grow and flex-shrink specifies how much the item will grow or shrink relative to the rest of the flexible items inside the same container. And the flex-basis specifies the initial length of a flexible item. In this case the bottom View will take up the remaining space. And in that space, we can have whatever flow we want. To move the button to the bottom, we use justifyContent to lay out items in the main axis, with flex-end , which aligns the flex items at the end of the container.
A compositional approach
While this works, code can be duplicated quickly as we need to do this in a lot of screens. All we need is to wrap this ImageButton inside a container . Let’s encapsulate this with a a utility function. Add this utils/moveToBottom.js
import React from 'react'
import { View, StyleSheet } from 'react-native'

function moveToBottom(component) {
  return (
    <View style={styles.container}>
      {component}
    </View>
  )
}

const styles = StyleSheet.create({
  container: {
    flex: 1,
    justifyContent: 'flex-end',
    marginBottom: 36
  }
})

export default moveToBottom
Now in our screen, we just need to import
import moveToBottom from 'library/utils/moveToBottom'
and wrap our button
{
  moveToBottom(
    <ImageButton
      style={styles.button}
      title={strings.onboarding.welcome.button}
      onPress={() => {
        this.props.navigation.navigate('Term')
      }} />
  )
}
This time, we have the same screen as before, but with more reusable code. Since the styles are inside our moveToBottom module, we don’t need to specify styles in our screen any more. Here is the full code
import React from 'react'
import { View, StyleSheet, Image, Text, Button } from 'react-native'
import strings from 'res/strings'
import palette from 'res/palette'
import images from 'res/images'
import ImageButton from 'library/components/ImageButton'
import moveToBottom from 'library/utils/moveToBottom'

export default class Welcome extends React.Component {
  render() {
    return (
      <View style={styles.container}>
        <Image
          style={styles.logo}
          source={images.logo} />
        <Image
          style={styles.image}
          source={images.placeholder} />
        <Text style={styles.heading}>{strings.onboarding.welcome.heading.toUpperCase()}</Text>
        <Text style={styles.text}>{strings.onboarding.welcome.text1}</Text>
        <Text style={styles.text}>{strings.onboarding.welcome.text2}</Text>
        {
          moveToBottom(
            <ImageButton
              style={styles.button}
              title={strings.onboarding.welcome.button}
              onPress={() => {
                this.props.navigation.navigate('Term')
              }} />
          )
        }
      </View>
    )
  }
}

const styles = StyleSheet.create({
  container: {
    flex: 1,
    alignItems: 'center'
  },
  logo: {
    marginTop: 70,
    marginBottom: 42,
  },
  image: {

},
  heading: {
    ...palette.heading, ...{
      marginTop: 40
    }
  },
  text: {
    ...palette.text, ...{
      marginHorizontal: 8,
      marginVertical: 10
    }
  }
})
How to pass component as parameter
I have to admit that I initially implement moveToBottom using Component (we need uppercase since React has a convention of using initial uppercase for components) to embed the Component inside View
function moveToBottom(Component) {
  return (
    <View style={styles.container}>
      <Component />
    </View>
  )
}
But this results in bundling error
ExceptionsManager.js:84 Warning: React.createElement: type is invalid -- expected a string (for built-in components) or a class/function (for composite components) but got: <ImageButton />. Did you accidentally export a JSX literal instead of a component?
and
ExceptionsManager.js:76 Invariant Violation: Invariant Violation: Invariant Violation: Element type is invalid: expected a string (for built-in components) or a class/function (for composite components) but got: object.
As this moment I release that the thing I pass in is actually an object, not a class , so I treat it as an object and it works
function moveToBottom(component) {
  return (
    <View style={styles.container}>
      {component}
    </View>
  )
}
marginBottom on Android
In the above moveToBottom function, I use marginBottom to have some margin from the bottom. This works on iOS but somehow does not have any effect in Android, and I use react-native 0.57.0 at the moment. This inconsistence can happen often in React Native development. A quick workaround is to perform platform check, we can make it into a nifty function in src/library/utils/check
import { Platform } from 'react-native'

const check = {
  isAndroid: () => {
    return Platform.OS === 'android'
  }
}

export default check
Then in moveToBottom , let ‘s use paddingBottom in case of app running in Android
const styles = StyleSheet.create({
  container: {
    flex: 1,
    justifyContent: 'flex-end',
    paddingBottom: check.isAndroid ? 14 : 0
  }
})
Where to go from here
In this post, we go from absolute position to another container, get to know flex , how to add reusable function and how to correctly pass component as parameter. Hope you find it useful. You can also check out this post React Native Login Using the Facebook SDK where I shows more tips for React Native developments and recommended links to learn about Flexbox.
Start the conversation