
Issue #744
As someone who builds lots of apps, I try to find quick ways to do things. One of them is to avoid repetitive and cumbersome APIs. That’s why I built Anchors to make Auto Layout more convenient, Omnia to add missing extensions. The next thing in the itchy list is the many ways to communicate among objects in iOS and macOS development that can be very annoying sometimes.
This post is my take on tackling some communication patterns issue and how to make it simpler with EasyClosure. The learning applies for both iOS and macOS development, and code is in Swift 5.
Table of Contents
- The many communication patterns
- Associated objects
- Protocol with associated type
- Action to RxSwift observable
- Timer keeps a strong reference to its target
- Key-value observing in Swift 5
- Block-based Notification Center
The many communication patterns
In iOS, we can handle button tap by using addTarget which is a function that any UIControl has:
let button = UIButton()
button.addTarget(self, action: #selector(buttonTouched(_:)), for: .touchUpInside)

@objc func buttonTouched(_ sender: UIButton) {}
In macOS, due to historical reasons, the syntax is a bit different:
button.target = self
button.action = #selector(buttonTouched(_:))

@objc func buttonTouched(_ sender: NSButton) {}
The more complex the app, the more we need to split responsibilities for classes and make them communicate. Target action is not the only way for objects communication, there are delegates, notification center, KVO and blocks. All of these are used all over the placed within iOS SDKs. Not only do we have to be aware of syntax differences, but we also have to care about how and when to use one over another.
This article Communication Patterns from objc.io is my favorite and many of the principles still hold true for now.
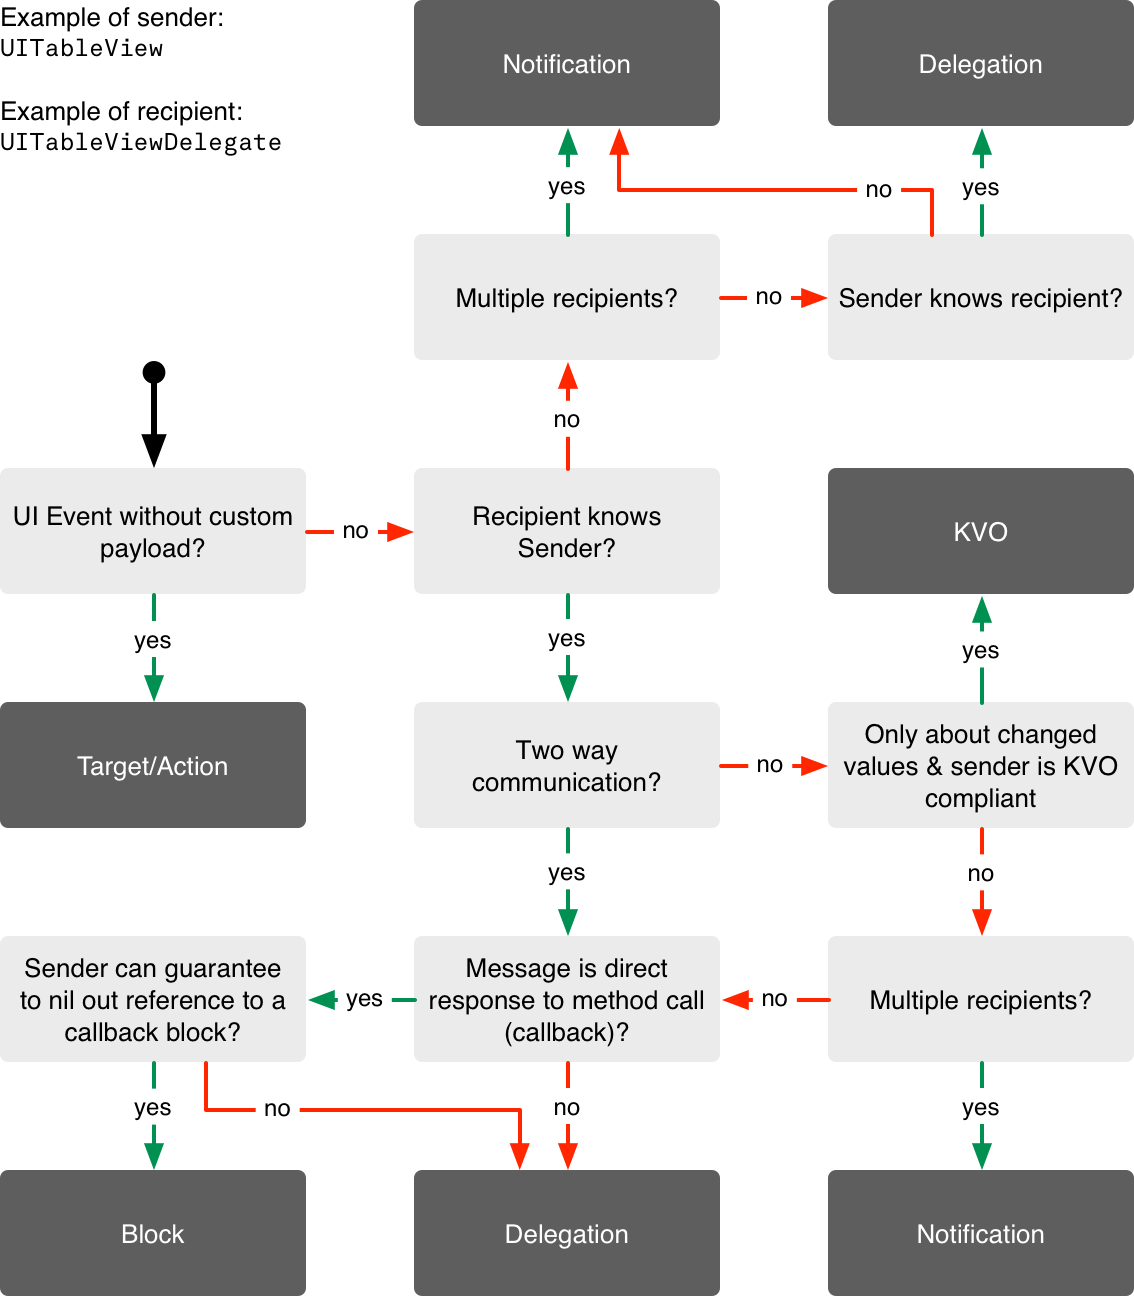 https://www.objc.io/issues/7-foundation/communication-patterns/
As I do many apps, I’m a bit baffled by cumbersome APIs, I wish I could write code in a more succinct and convenient way. Something like:
button.on.tap { print("button was tapped" }
user.on.propertyChange(\.name) { print("name has changed to \($0)"}
tableView.on.tapRow { print("row \($0) was tapped" }
This may seem a bit overengineered and some of you may feel OK with the iOS APIs. I have to admit that I prefer explicit over the clever code, but in this case, we can make the APIs look a bit nicer. This is achieved with a less known featured in ObjC Runtime called associated objects.
In the old Objective C age, there was the famous BlocksKit which allows us to deal with UIKit/AppKit in the handy block syntax. Although Objective C block is hard to declare, they are much more declarative than other communication patterns like delegate or handling UIAlert actions. And with the closure in Swift, we can do even nicer things.
Associated objects
With Objective C category and Swift extension, we can’t add a stored property, that’s where associated objects come into play. The associated object allows us to attach other objects to the lifetime of any NSObject , with these 2 free functions objc_getAssociatedObject and objc_setAssociatedObject .
The associated object lies in the Objective C runtime category and can be considered hacky, but it has shown to be very effective in some scenarios.
Detecting object deallocation
Since the associated object is attached to the host object, there’s this very handy use case that allows detection of the life cycle of the host object. We can, for example, observe UIViewControllerto tell if it has really been deallocated.
class Notifier {
    deinit {
        print("host object was deinited")
    }
}

extension UIViewController {
    private struct AssociatedKeys {
        static var notifier = "notifier"
    }

var notifier: Notifier? {
        get {
            return objc_getAssociatedObject(self, &AssociatedKeys.notifier) as? Notifier
        }

set {
            if let newValue = newValue {
                objc_setAssociatedObject(
                    self,
                    &AssociatedKeys.notifier,
                    newValue as Notifier?,
                    .OBJC_ASSOCIATION_RETAIN_NONATOMIC
                )
            }
        }
    }
}
Then if we at some time set the host object to nil, the associated object will be deallocated too, giving us a callback to handle to deinit event:
var viewController: UIViewController? = UIViewController()
viewController?.notifier = Notifier()
viewController = nil
XCTAssertNil(viewController?.notifier)
Confusing code completion
If we’re gonna make the on extension to UIButton, UITableView, UIViewController we have to add the associated object into NSObject for all these classes to have on property.
class On {
    func tap(_ closure: () -> Void) {}
    func tapRow(_ closure: () -> Void) {}
    func textChange(_ closure: () -> Void) {}
}
to NSObject:
extension NSObject {
    private struct AssociatedKeys {
        static var on = "on"
    }

var on: On? {
        get {
            return objc_getAssociatedObject(self, &AssociatedKeys.on) as? On
        }

set {
            if let newValue = newValue {
                objc_setAssociatedObject(
                    self,
                    &AssociatedKeys.on,
                    newValue as On?,
                    .OBJC_ASSOCIATION_RETAIN_NONATOMIC
                )
            }
        }
    }
}
This brings another problem with code completion, we can act on UIButton but Xcode still hints us about all methods on On , but for UIButton only tap and propertyChange are valid. The textChange is more for UITextField and UITextView:
button.on.textChange {}
Protocol with associated type
To remedy this awkward API, we can use a very sweet feature of Swift called protocol with an associated type. We start by introducing EasyClosureAware that has a host EasyClosureAwareHostType of type AnyObject. This means that this protocol is for any class that wants to attach itself to a host object.
private struct AssociatedKey {
    static var key = "EasyClosure_on"
}

public protocol EasyClosureAware: class {
    associatedtype EasyClosureAwareHostType: AnyObject

var on: Container<EasyClosureAwareHostType> { get }
}

extension EasyClosureAware {
    public var on: Container<Self> {
        get {
            if let value = objc_getAssociatedObject(self, &AssociatedKey.key) as? Container<Self> {
                return value
            }

let value = Container(host: self)
            objc_setAssociatedObject(self, &AssociatedKey.key, value, .OBJC_ASSOCIATION_RETAIN_NONATOMIC)
            return value
        }
    }
}

extension NSObject: EasyClosureAware { }
Then we confirm NSObject to EasyClosureAware so every NSObject subclass has the on property for free.
The Container is for containing all targets and to keep all target alive. With this approach we can wrap around any patterns like delegate, target action and KVO observer.
public class Container<Host: AnyObject>: NSObject {
    public unowned let host: Host

    public init(host: Host) {
        self.host = host
    }

    // Keep all targets alive
    public var targets = [String: NSObject]()
}
With this setup, we can easily apply to any object. For example UIButton:
public extension Container where Host: UIButton {
    func tap(_ action: [@escaping](http://twitter.com/escaping) Action) {
        let target = ButtonTarget(host: host, action: action)
        targets[ButtonTarget.uniqueId] = target
    }
}

class ButtonTarget: NSObject {
    var action: Action?

init(host: UIButton, action: [@escaping](http://twitter.com/escaping) Action) {
        super.init()

self.action = action
        host.addTarget(self, action: #selector(handleTap), for: .touchUpInside)
    }

// MARK: - Action

[@objc](http://twitter.com/objc) func handleTap() {
        action?()
    }
}
We have ButtonTarget that acts as target for target-action for UIButton , which inherits from UIControl .
Now to react to button tap, it’s as simple as calling:
button.on.tap {}
And Xcode shows correct auto-completion. If we’re about to use UITextField , there’s no code suggestions showing up as there’s no methods for UITextField yet:
textField.on. // ummh?
We need to add a method to Container that has UITextField constraint, for example:
public extension Container where Host: UITextField {
    func textChange(_ action: [@escaping](http://twitter.com/escaping) StringAction) {
        let target = TextFieldTarget(host: host, textAction: action)
        targets[TextFieldTarget.uniqueId] = target
    }
}

class TextFieldTarget: NSObject {
    var textAction: StringAction?

required init(host: UITextField, textAction: [@escaping](http://twitter.com/escaping) StringAction) {
        super.init()

self.textAction = textAction
        host.addTarget(self, action: #selector(handleTextChange(_:)), for: .editingChanged)
    }

// MARK: - Action

[@objc](http://twitter.com/objc) func handleTextChange(_ textField: UITextField) {
        textAction?(textField.text ?? "")
    }
}
I’ve used this technique extensively and it works on any platform like iOS, macOS, tvOS as they all base on Objective C Runtime and NSObject. We can easily extend it to any classes we want. This can replace target action, delegate, notification center, KVO or any other communication patterns.
In the next sections, let’s explore timer, KVO and notification and whether we should have our on closure.
Action to RxSwift observable
Having button.on.tap {} is nice, but it would be great if that can transform into Observablefor some RxSwift fans like me.
We can have our own RxButton like:
final class RxButton: UIButton {
    let tap = PublishSubject<()>()

override init(frame: CGRect) {
        super.init(frame: frame)

self.on.tap { tap.onNext(()) }
    }
}
We use PublishSubject to map from the imperative to the declarative world of Rx, then we can consume it:
button.tap.subscribe(onNext: {})
Timer keeps a strong reference to its target
Unlike target-action in UIControl where target is held weakly, Timer keeps its target strongly to deliver tick event.
If you are using init(timeInterval:target:selector:userInfo:repeats:) then please read the section about target carefully.
The object to which to send the message specified by aSelector when the timer fires. The timer maintains a strong reference to this object until it (the timer) is invalidated.
This is what we did before iOS 10:
func schedule() {
    DispatchQueue.main.async {
      self.timer = Timer.scheduledTimer(timeInterval: 20, target: self,
                                   selector: #selector(self.timerDidFire(timer:)), userInfo: nil, repeats: false)
    }
}

[@objc](http://twitter.com/objc) private func timerDidFire(timer: Timer) {
    print(timer)
}
We can easily extend Timer with our on property by introducing tick method:
public extension Container where Host: Timer {

func tick(_ action: [@escaping](http://twitter.com/escaping) Action) {
        self.timerTarget?.action = action
    }
}

class TimerTarget: NSObject {
    var action: Action?

[@objc](http://twitter.com/objc) func didFire() {
        action?()
    }
}

public extension Timer {
    static func scheduledTimer(withTimeInterval interval: TimeInterval, repeats: Bool) -> Timer {
        let target = TimerTarget()
        let timer = Timer.scheduledTimer(timeInterval: interval,
                                         target: target,
                                         selector: #selector(TimerTarget.didFire),
                                         userInfo: nil,
                                         repeats: repeats)
        timer.on.timerTarget = target
        return timer
    }
}
So we can use with timer.on.tick:
timer = Timer.scheduledTimer(withTimeInterval: 1, repeats: true)
timer.on.tick { print("tick") }
But as of iOS 10, Timer gets its closure based API, so now we can just call the static method scheduledTimer:
DispatchQueue.main.async {
      self.timer = Timer.scheduledTimer(withTimeInterval: 20, repeats: false) { timer in
        print(timer)
      }
}
Now that Timer gets better API, our on property on Timer is no longer needed, which is fine.
Key-value observing in Swift 5
Key-value observing is the ability to watch property change for an NSObject , before Swift 5 the syntax is quite verbose and error-prone with addObserver and observeValuem methods. This is not to mention the usage of context , especially in the subclassing situation, where we need a context key to distinguish between observations of different objects on the same keypath.
public extension Container where Host: NSObject {

func observe(object: NSObject, keyPath: String, _ action: [@escaping](http://twitter.com/escaping) AnyAction) {
        let item = KeyPathTarget.Item(object: object, keyPath: keyPath, action: action)
        keyPathTarget.items.append(item)
        object.addObserver(keyPathTarget, forKeyPath: keyPath, options: .new, context: nil)
    }

func unobserve(object: NSObject, keyPath: String? = nil) {
        let predicate: (KeyPathTarget.Item) -> Bool = { item in
            return item.object === object
                && (keyPath != nil) ? (keyPath! == item.keyPath) : true
        }

keyPathTarget.items.filter(predicate).forEach({
            object.removeObserver(keyPathTarget, forKeyPath: $0.keyPath)
        })

keyPathTarget.items = keyPathTarget.items.filter({ !predicate($0) })
    }
}

class KeyPathTarget: NSObject {
    class Item {
        let object: NSObject
        let keyPath: String
        let action: AnyAction

init(object: NSObject, keyPath: String, action: [@escaping](http://twitter.com/escaping) AnyAction) {
            self.object = object
            self.keyPath = keyPath
            self.action = action
        }
    }

var items = [Item]()

deinit {
        items.forEach({ item in
            item.object.removeObserver(self, forKeyPath: item.keyPath)
        })

items.removeAll()
    }

// MARK: - KVO
    override func observeValue(forKeyPath keyPath: String?,
                               of object: Any?,
                               change: [NSKeyValueChangeKey : Any]?,
                               context: UnsafeMutableRawPointer?) {
        guard let object = object as? NSObject,
            let keyPath = keyPath,
            let value = change?[.newKey] else {
                return
        }

let predicate: (KeyPathTarget.Item) -> Bool = { item in
            return item.object === object
                && keyPath == item.keyPath
        }

items.filter(predicate).forEach({
            $0.action(value)
        })
    }
}
Then we can have an observer to observe contentSize of UIScrollView like:
let observer = NSObject()
observer.on.observe(object: scrollView: keyPath: #keyPath(UIScrollView.contentSize)) { value in  print($0 as? CGSize)}
Starting from Swift 5, there’s an introduction of KeyPath syntax and improvement to KVO. Now we can just:
@objc class User: NSObject {
    @objc dynamic var name = "random"
}

let thor = Person()

thor.observe(\User.name, options: .new) { user, change in
    print("User has a new name \(user.name)")
}

thor.name = "Thor"
As for KVO, we need to mark @objc and dynamic for it to work. The rest is just to call observe on the object with the KeyPath we want to observe.
Block-based Notification Center
NotificationCenter is the mechanism to post and receive notification system-wide. Starting from iOS 4, NotificationCenter got its block API addObserverForName:object:queue:usingBlock:
The only thing to notice is that block parameter being copied.
The block to be executed when the notification is received. The block is copied by the notification center and (the copy) held until the observer registration is removed.
As for EasyClosure, to wrap around NotficationCenter is easy:
public extension Container where Host: NSObject {

func observe(notification name: Notification.Name,
                 _ action: [@escaping](http://twitter.com/escaping) NotificationAction) {
        let observer = NotificationCenter.default.addObserver(
            forName: name, object: nil,
            queue: OperationQueue.main, using: {
                action($0)
        })

notificationTarget.mapping[name] = observer
    }

func unobserve(notification name: Notification.Name) {
        let observer = notificationTarget.mapping.removeValue(forKey: name)

if let observer = observer {
            NotificationCenter.default.removeObserver(observer as Any)
            notificationTarget.mapping.removeValue(forKey: name)
        }
    }
}

class NotificationTarget: NSObject {
    var mapping: [Notification.Name: NSObjectProtocol] = [:]

deinit {
        mapping.forEach({ (key, value) in
            NotificationCenter.default.removeObserver(value as Any)
        })

mapping.removeAll()
    }
}
And with its on extension:
viewController.on.observe(notification: Notification.Name.UIApplicationDidBecomeActive) { notification in
  print("application did become active")
}

viewController.on.unobserve(notification: Notification.Name.UIApplicationDidBecomeActive)
This is for demonstration purpose only as the default NotificationCenter with block-based API is good enough. There are some cautions when using it NSNotificationCenter with blocks considered harmful that’s good to be aware of.
Where do we go from here
We’ve learned how to make use of associated objects and make nicer APIs. EasyClosure is designed to be extensible and we can wrap any communication patterns. KVO and NotificationCenter APIs have become better starting iOS 10 and Swift 5, and we see a trend of more closure based API as they are declarative and convenient. When we can, we should stick to the system APIs as much as possible and only make our sugar when needed.
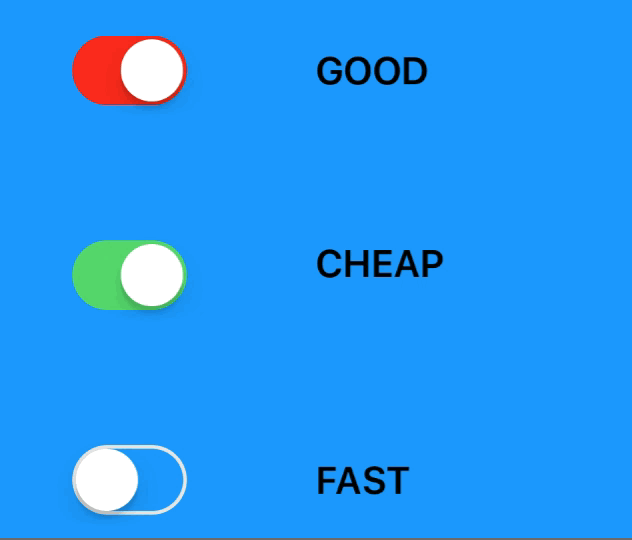
I hope you find this article helpful, here ‘s a fun gif made with EasyClosure APIs:
func allOn() -> Bool {
  return [good, cheap, fast].filter({ $0.isOn }).count == 3
}

good.on.valueChange { _ in
  if allOn() {
    fast.setOn(false, animated: true)
  }
}

cheap.on.valueChange { _ in
  if allOn() {
    good.setOn(false, animated: true)
  }
}

fast.on.valueChange { _ in
  if allOn() {
    cheap.setOn(false, animated: true)
  }
}
Start the conversation