
Issue #682
After has recently reminded about his updating APNs provider API which makes me realised a lot has changed about push notifications, both in terms of client and provider approach.
The HTTP/2-based Apple Push Notification service (APNs) provider API lets you take advantage of great features, such as authentication with a JSON Web Token, improved error messaging, and per-notification feedback. If you send push notifications with the legacy binary protocol, we strongly recommend upgrading to the APNs provider API.
From the the iOS client point of view, you pretty much don’t need to care about provider API, as you only need to register for push notification capability and send the device token to your backend, and it’s the backend’s job to send push request to Apple notifications server.
But it’s good to know the underlying mechanism, especially when you want to troubleshoot push notification. Since a push notification failure can be because of many reasons: it could be due to some failed logic in your backend, or that the push certificate has expired, or that you have sent the wrong device token, or that user has turned off push permission in Settings app, or that the push has been delayed.
Here’s also a common abbreviations you need to learn: APNs it is short for Apple Push Notification service. You can think of it as the server your device always has connection with, so you’re ready for any server push messages from it.
What is binary provider API
Push notification feature was first introduced by Apple in 2009 via a fairly complex binary provider API

In short, binary provider API is just a specification about which address and which format to send push request to Apple push server. The binary interface of the production environment is available through gateway.push.apple.com, port 2195 and development environment gateway.sandbox.push.apple.com, port 2195. The binary interface employs a plain TCP socket for binary content that is streaming in nature.
As you can see in the package instruction above, we need specify frame length and data. Data is a key value pairs of multiple informations like device token, expiration, topic, priority.
Send request to the above addresses via secured TLS or SSL channel. The SSL certificate required for these connections is obtained from your developer account.
The new HTTP/2 provider API
The new HTTP2/ provider API is recommended, it has detailed error reporting and better throughput. If you use URLSession which supports the HTTP/1.1 and HTTP/2 protocols. HTTP/2 support, as described by RFC 7540, you will feel familiar.
In short, when you have a notification to send to a user, your provider must construct a POST request and send it to Apple Push Notification service (APNs). Your request must include the following information:
- The JSON payload that you want to send
- The device token for the user’s device
- Request-header fields specifying how to deliver the notification
- For token-based authentication, your provider server’s current authentication token
Upon receiving your server’s POST request, APNs validates the request using either the provided authentication token or your server’s certificate. If validation succeeds, APNs uses the provided device token to identify the user’s device. It then tries to send your JSON payload to that device.
So it’s pretty much how you configure URLRequest with URLSession, specify base url, some request headers including the authorization and the payload body.
Use HTTP/2 and TLS 1.2 or later to establish a connection to the new provider API endpoint. For development serverit is api.sandbox.push.apple.com:443 and for production server it is api.push.apple.com:443. You then send the request as POST and Apple will do its job to verify and send the push notification to the users device.
Certificate vs token based authentication
To send push request to APNs, you need to authenticate to tell that is really from you. APNs support 2 types of authentication, the traditional way with a certificate, and the recently new recommended way with a p8 token.
Certificate based authentication
For certificate based authentication, you will need a p12 certificate which you can obtain and generate from your Developer account.

Because there are sandbox and production push endpoint, few years ago it was required to have separate sandbox and production environment push certificate, which you had to create separately in your Apple developer account, then in testing need to specify the correct push certificate for each environment.
Now around iOS 10 year we can use just 1 single certificate for both sandbox and production, which is a relief for us developers. When we create certificate on Apple developer page, we need to upload a certificate signing request that we can generate from Keychain Access app. After we download the generated push certificate, download and run it in Keychain, there we can generate p12 key file that contains both certificate and private key to sign our push request.
Certificate and provisioning profiles valid for only 1 year. So every year you have to renew push notification certificates, which is also a good and bad thing. Besides that, every app differs from bundle id, so we kinda have to generate certificate for each app.
Token based authentication
Token-based authentication offers a stateless way to communicate with APNs. Stateless communication is faster than certificate-based communication because it doesn’t require APNs to look up the certificate, or other information, related to your provider server. There are other advantages to using token-based authentication:
The cool thing about token is that you can use one token to distribute notifications for all of your company’s apps. You can create in your Apple developer account. Key authentication is the recommended way to authenticate with Apple services, so it is used not only for push services, but also for MusicKit and DeviceCheck.

When you request a key, Apple gives you a 10-character string with the Key ID which you must include this string in your JSON tokens and an authentication token signing key, specified as a text file (with a .p8 file extension). The key is allowed to download once and you need to keep it properly.
The token that you include with your notification requests uses the JSON Web Token (JWT) specification. The token itself contains four key-value pairs
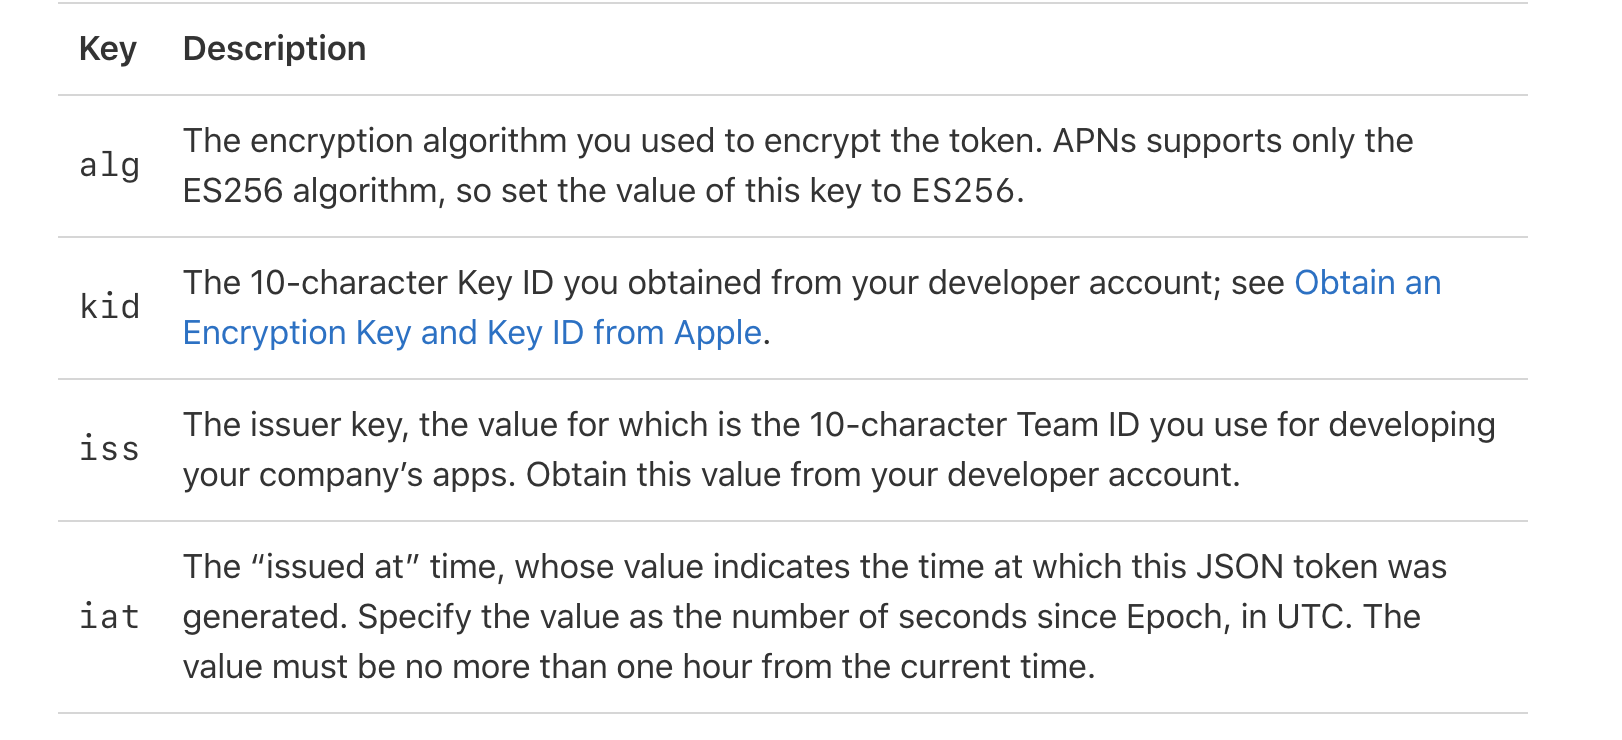
After all, the JSON Web Token is encoded in this authorization HTTP headers in your request like this
authorization = bearer eyAia2lkIjogIjhZTDNHM1JSWDciIH0.eyAiaXNzIjogIkM4Nk5WOUpYM0QiLCAiaWF0I
		 jogIjE0NTkxNDM1ODA2NTAiIH0.MEYCIQDzqyahmH1rz1s-LFNkylXEa2lZ_aOCX4daxxTZkVEGzwIhALvkClnx5m5eAT6
		 Lxw7LZtEQcH6JENhJTMArwLf3sXwi
For security, APNs requires you to refresh your token regularly. Refresh your token no more than once every 20 minutes and no less than once every 60 minutes.
How to register for push notifications from iOS app
The APIs to register for remote notification has changed over the years.
iOS 7
In iOS 7, we used to use this method registerForRemoteNotificationTypes to register to receive remote notifications of the specified types via Apple Push Notification service.
The types can be UIRemoteNotificationTypeBadge, UIRemoteNotificationTypeAlert, UIRemoteNotificationTypeSound
When you send this message, the device initiates the registration process with Apple Push Notification service. If it succeeds, the app delegate receives a device token in the application:didRegisterForRemoteNotificationsWithDeviceToken: method; if registration doesn’t succeed, the delegate is informed via the application:didFailToRegisterForRemoteNotificationsWithError: method. If the app delegate receives a device token, it should connect with its provider and pass it the token.
iOS 8 with registerUserNotificationSettings
From iOS 8, there’s separation between asking for a remote notification with device token, and with presenting push message to the user. This confused developers as these 2 things are separate now.
First, we use registerForRemoteNotifications to register to receive remote notifications via Apple Push Notification service.
Call this method to initiate the registration process with Apple Push Notification service. If registration succeeds, the app calls your app delegate object’s application(_:didRegisterForRemoteNotificationsWithDeviceToken:) method and passes it a device token. You should pass this token along to the server you use to generate remote notifications for the device. If registration fails, the app calls its app delegate’s application(_:didFailToRegisterForRemoteNotificationsWithError:) method instead.
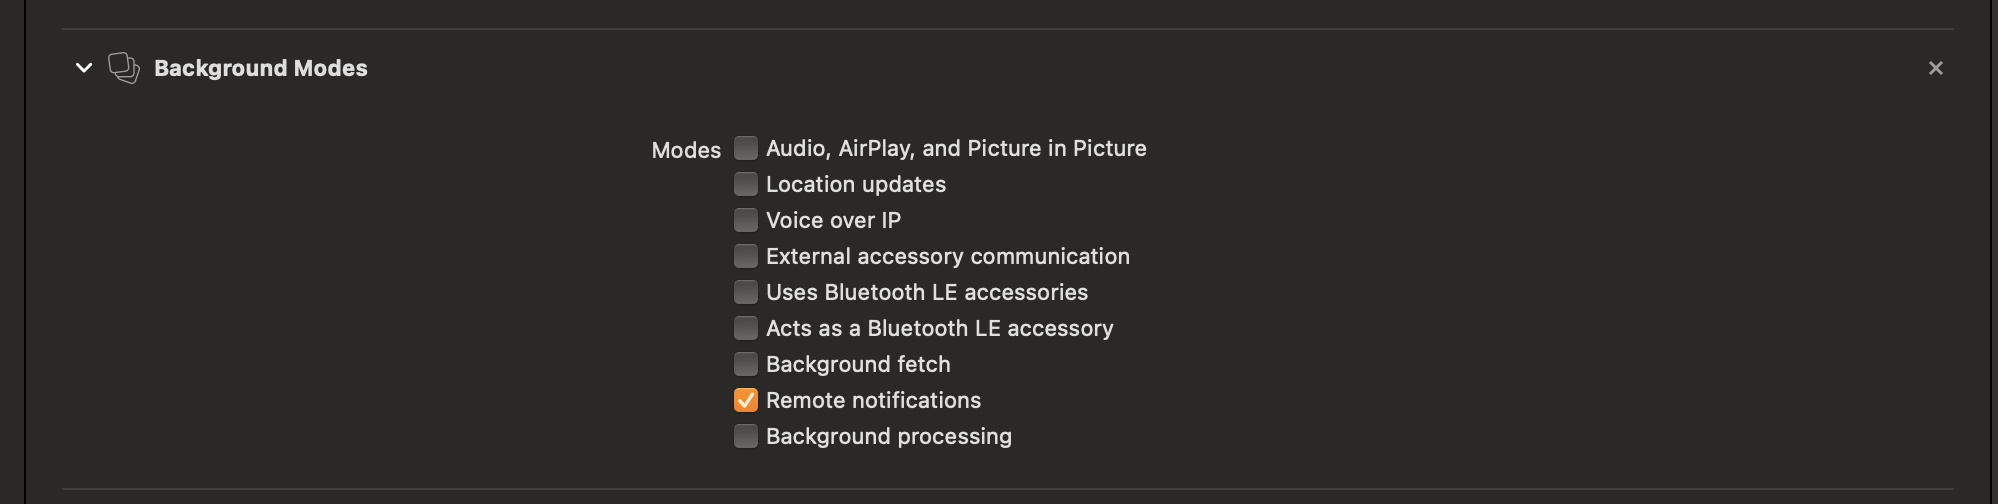
In short, this is to receive device token from APNs so we can do silent push notification or other things. Note that we need to enable Remote notification capability for Background modes.
To present push message to user via alert, banner, badge or sound, we need to explicitly ask for using this method registerUserNotificationSettings to registers your preferred options for notifying the user.
If your app displays alerts, play sounds, or badges its icon, you must call this method during your launch cycle to request permission to alert the user in these ways. After calling this method, the app calls the application(_ application: UIApplication, didRegister notificationSettings: UIUserNotificationSettings) method of its app delegate to report the results. You can use that method to determine if your request was granted or denied by the user.
iOS 10 with UserNotifications framework
In iOS 10, Apple introduced UserNotifications and UserNotificationsUI framework and lots of new features to push notifications like actions and attachments.
To ask for permission to present push message from iOS 10, use the new UNUserNotificationCenter which accepts options and block callback with grant status.
UNUserNotificationCenter.current().requestAuthorization(options: [.badge, .sound, .alert])

There ’s also UNNotificationAction and UNNotificationAttachment to specify additional actions and attachment to go along with the push message, this is very handy for visual purpose and convenient actions user can perform right away from the push message.
There’s also a convenient UserNotificationsUI that was shipped with iOS 10 that allows us to embed custom view controller from our push message

When an iOS device receives a notification containing an alert, the system displays the contents of the alert in two stages. Initially, it displays an abbreviated banner with the title, subtitle, and two to four lines of body text from the notification. If the user presses the abbreviated banner, iOS displays the full notification interface, including any notification-related actions. The system provides the interface for the abbreviated banner, but you can customize the full interface using a notification content app extension.
Also, there is this callback userNotificationCenter _:willPresent that asks the delegate how to handle a notification that arrived while the app was running in the foreground.
If your app is in the foreground when a notification arrives, the shared user notification center calls this method to deliver the notification directly to your app. If you implement this method, you can take whatever actions are necessary to process the notification or show it when your app is running.
iOS 12 with provisional push
New in iOS 12 is the UNAuthorizationStatus.provisional, which are notifications that appear silently in the user’s notification center without appearing on the user’s home screen. We can start sending them as soon as a user has downloaded and run your app for the first time. You can send provisional push notifications unlimited times unless the user explicitly turns them off.
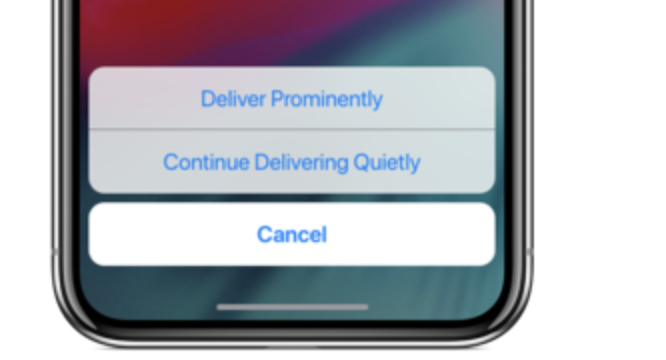
This is good to send unobtrusive push to users in their Notification Center where they can pick up at a later time.
iOS 13 with apns-push-type
Starting with iOS 13 and watchOS 6, there is apns-push-type which must accurately reflect the contents of your notification’s payload. If there is a mismatch, or if the header is missing on required systems, APNs may return an error.
The apns-push-type header field has six valid values. The descriptions below describe when and how to use these values. For example alert for notifications that trigger a user interaction and background for notifications that deliver content in the background.
In a WWDC 2019 session Advances in App Background Execution, apns-priority must be set to 5 for content available notifications.
iOS 14 with ephemeral authorization status and AppClip
From Enable your App Clip to schedule and receive notifications for a short or extended time period.
Some App Clips may need to schedule or receive notifications to provide value. Consider an App Clip that allows users to order food for delivery: By sending notifications, the App Clip informs the user about an upcoming delivery. If notifications are important for your App Clip’s functionality, enable it to schedule or receive notifications for up to 8 hours after each launch.
Remote notification only with content-available
Besides user interface notification, there is content-available notification that delivers notifications that wake your app and update it in the background. If your app’s server-based content changes infrequently or at irregular intervals, you can use background notifications to notify your app when new content becomes available. Read Pushing Background Updates to Your App
Testing push notification in simulator
We have been able to drag images to the Photos app in simulator for years, but new in Xcode 11.4 is the ability to drag push payload to simulator to simulate remote push notification.
All we have to do is create an apns file with Simulator Target Bundle key to specify our app, then drag to the simulator
{
    "Simulator Target Bundle": "com.onmyway133.PushHero",
    "aps": {
        "alert": "Welcome to Push Hero",
        "sound": "chime",
        "badge": 2
    }
}
Many of the simulator features can be controlled via xcrun simctl command line tool where you can change status bar time, battery info, start and stop certain simulators and send push with xcrun simctl push. This is very handy in case you want to automate things.
Test push notification easily with Push Hero
As iOS developers who need to test push notification a lot, I face this challenge. That’s why I made Push Hero as a native macOS application that allows us to reliably test push notification. It is written in pure Swift with all the new APNs specification in mind.
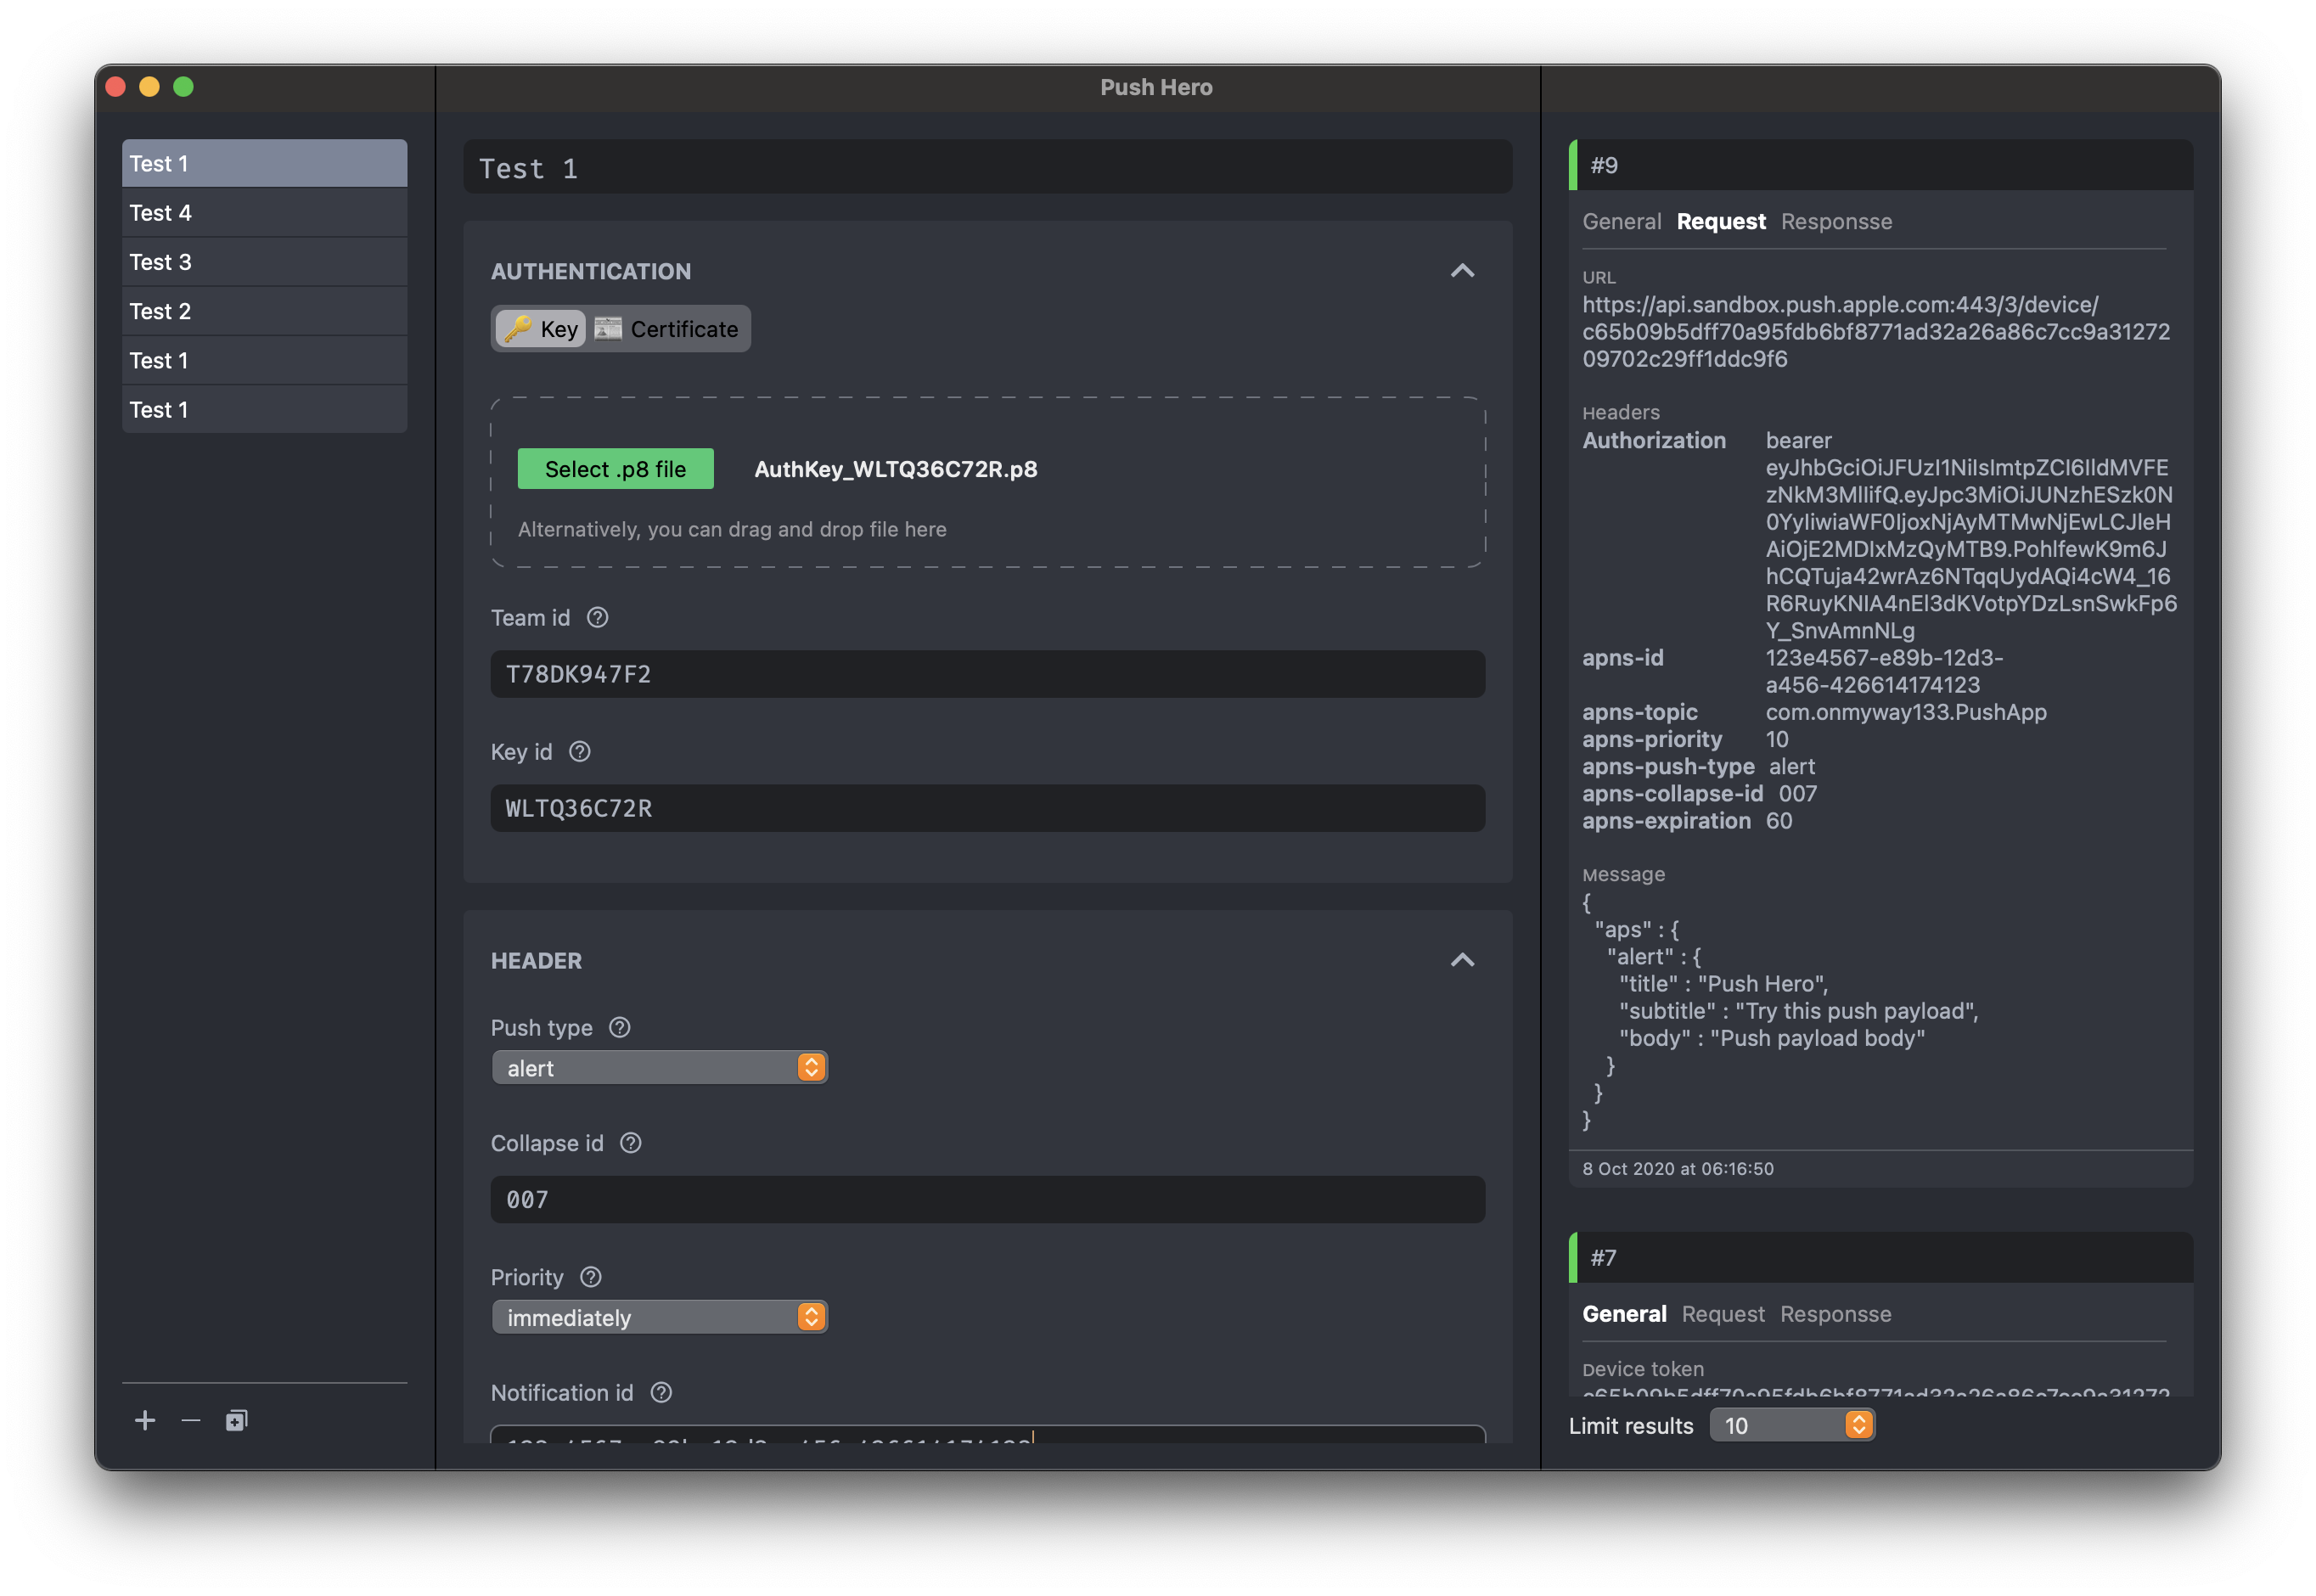
With Push Hero, we can setup multiple test scenario for different app. Each we can specify the authentication method we want, either with p8 token or p12 certificate based. There’s also input validation and hint helper that explains which field is needed and in which format, so you save time to work on your push testing instead.
New in latest version of Push Hero is the ability to send multiple pushes to multiple device tokens, which is the most frequent request. In the right history pane, there’s information about each request and response content, together with apns id information.
Also in Push Hero is the popup to show explanation for each field, and you need to consult Sending Notification Requests to APNs documentation as there are some specifications there. For example with VoIP push, the apns-topic header field must use your app’s bundle ID with .voip appended to the end. If you’re using certificate-based authentication, you must also register the certificate for VoIP services
Conclusion
Push notification continues to be important for iOS apps, and Apple has over the years improved and changed it for the better. This also means lots of knowledge to keep up with. Understanding provider APNs, setting up certificate and JSON Web Token key can be intimidating and take time.
Hopefully the above summary gets you more understanding into push notification, not only the history of changes in both client and provider API, but also some ways to test it easily.
Start the conversation