
Issue #792
iOS 13 introduced Dark Mode with User Interface Style that makes it easy to support dark and light theme in our apps. Before we dive in, here are some official resources
- WWDC 2019 Implementing Dark Mode on iOS
- Supporting Dark Mode in Your Interface
- Choosing a Specific Interface Style for Your iOS App
Adaptive color
Like adaptive layout that adapts to different screen sizes, adaptive colors adapt to different user interface styles, for now they are light and dark mode. Apple proposes 2 ways to create adaptive color: semantic color and defining custom colors in Asset Catalog
Semantic color
Choose colors with names like labelColor. These semantic colors convey the intended use of the color, rather than specific color values. When designing user interface, we should consult Apple Human Interface Guideline for design practices. Here is about Color
iOS offers a range of system colors that automatically adapt to vibrancy and changes in accessibility settings like Increase Contrast and Reduce Transparency. The system colors look great individually and in combination, on both light and dark backgrounds, and in both light and dark modes.

In addition to tint colors, iOS also provides semantically defined system colors that automatically adapt to both light and dark modes. A semantic color conveys its purpose rather than its appearance or color values. For example, iOS defines colors for use in background areas and for foreground content, such as labels, separators, and fill.
With both sets of background colors, you generally use the variants to indicate hierarchy in the following ways:
- Primary for the overall view
- Secondary for grouping content or elements within the overall view
- Tertiary for grouping content or elements within secondary elements
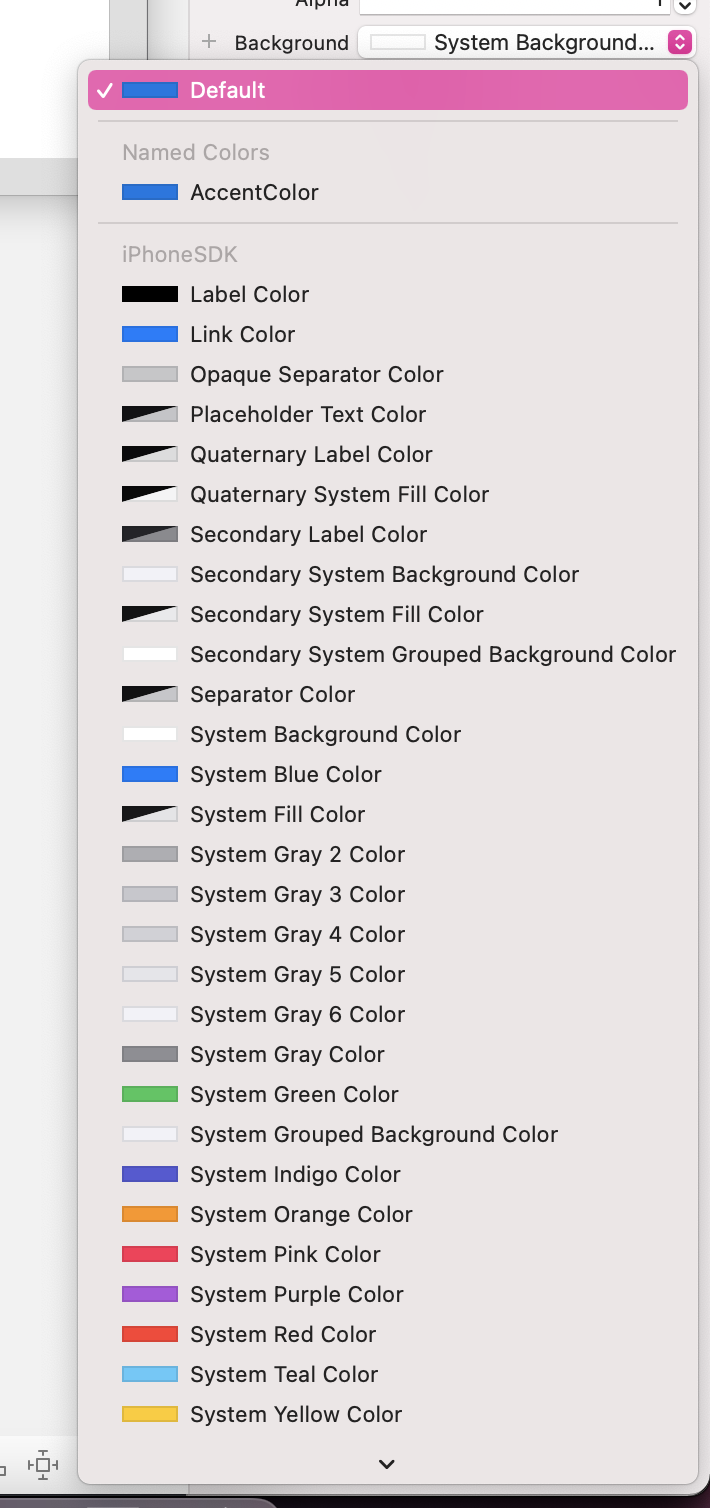
When selecting color in Storyboard, you can see a list of system colors, which suit your need most of the time.
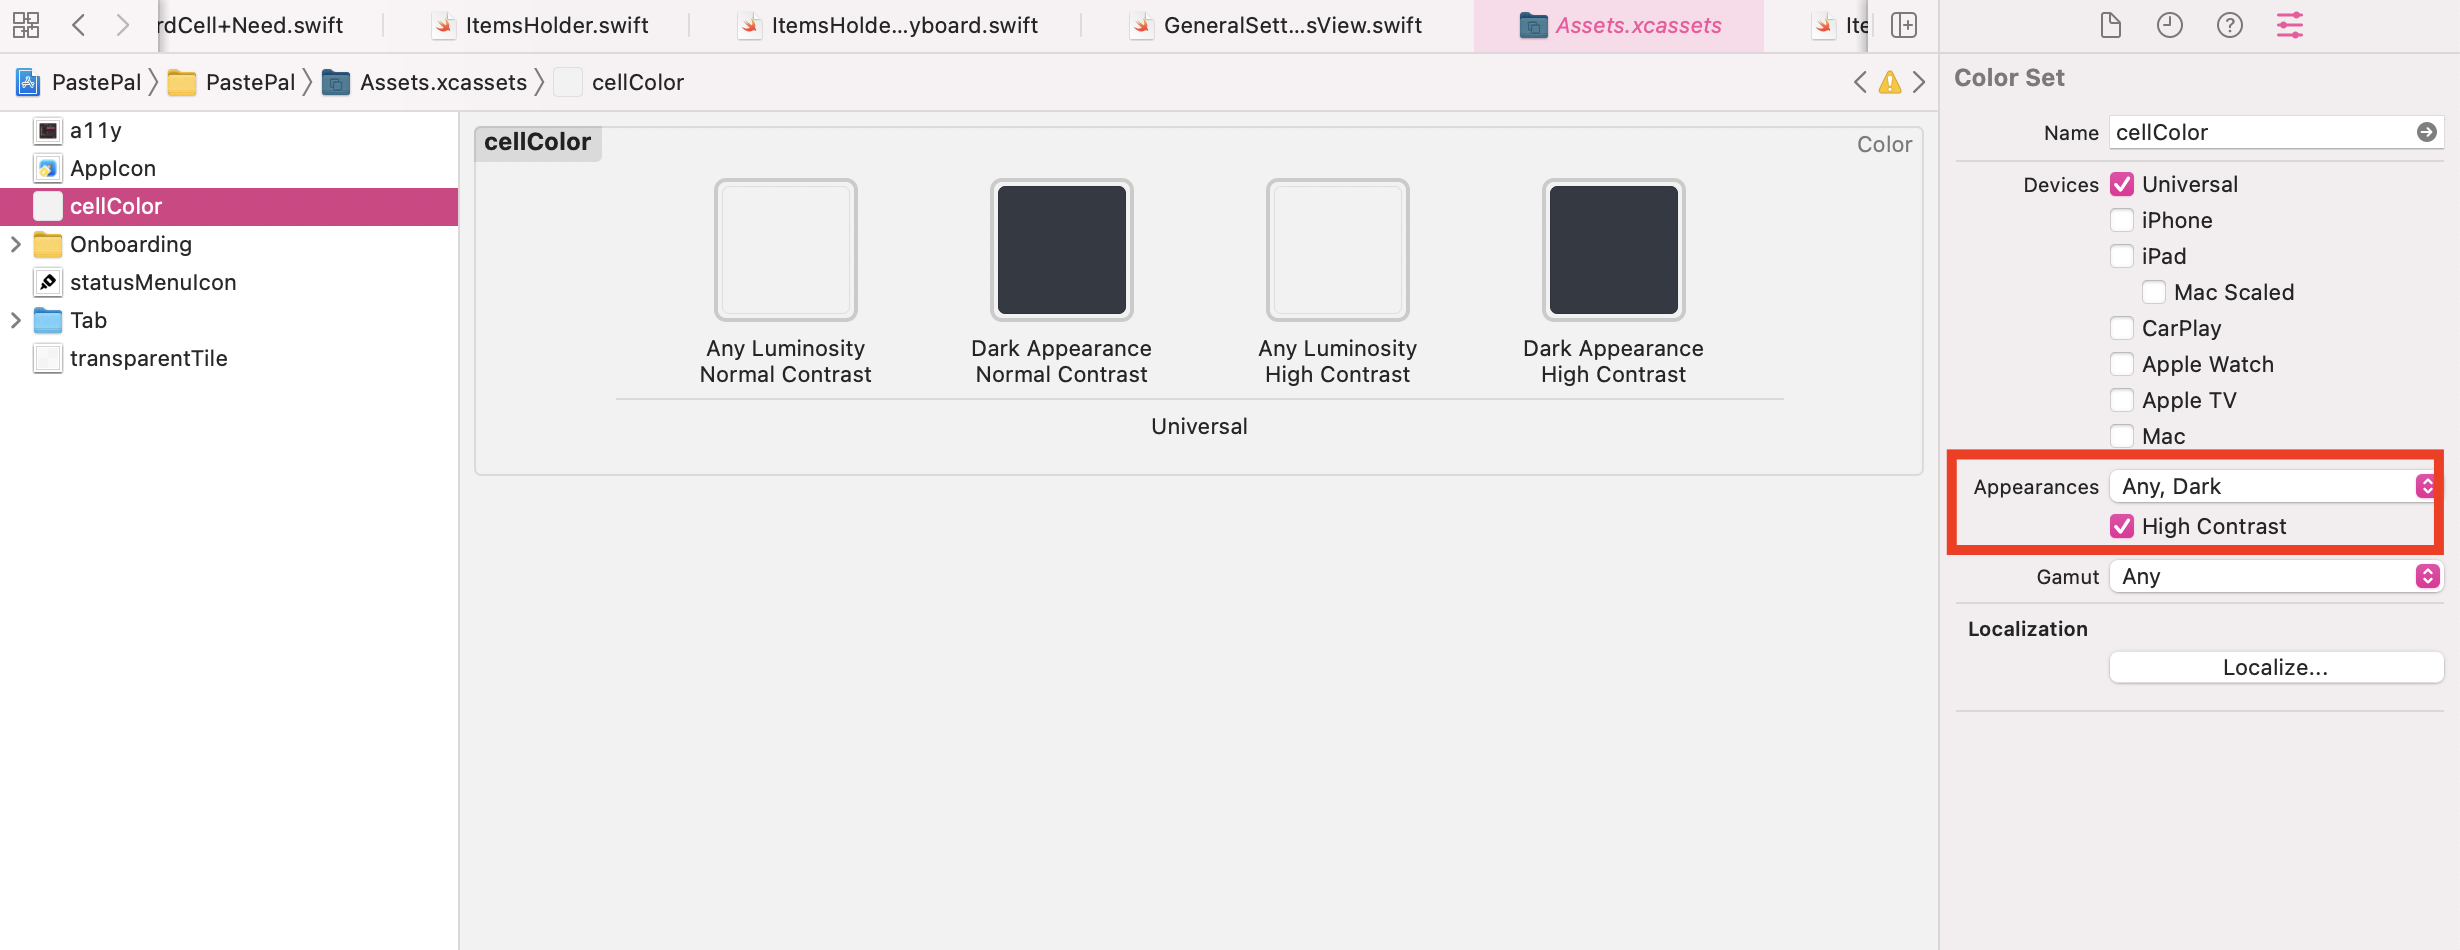
Custom color in Asset Catalog
We can define color, and also images for different user interface style. We can also check High Contrast option to have an option for accessibility color
We can access them by name. A tip is to use tools like SwiftGen that provides compile time type safe values instead of using string.
// macOS
let aColor = NSColor(named: NSColor.Name("cellColor"))

// iOS
let aColor = UIColor(named: "cellColor")
Custom color in code
UIColor has new init method init(dynamicProvider:) to create a color object whose component values change based on the currently active traits
The trait collection to use when generating the color information. Always use the traits in this collection, and not the traits of the current environment, when determining the color information.
UIColor { (traits) -> UIColor in
    traits.userInterfaceStyle == .dark ? UIColor(hex: 0xf2f2f2) : UIColor(hex: 0x555d50)
}
Dynamic color in macOS
NSColor also has a new init with dynamicProvider, starting from macOS 10.15
init(name colorName: NSColor.Name?, dynamicProvider: @escaping (NSAppearance) -> NSColor)
I usually use bestMatch to quickly check appearance on macOS
extension NSAppearance {
    var isDarkMode: Bool {
        if self.bestMatch(from: [.darkAqua, .aqua]) == .darkAqua {
            return true
        } else {
            return false
        }
    }
}
You can also check this key AppleInterfaceStyle in UserDefaults
UserDefaults.standard.string(forKey: "AppleInterfaceStyle") == "Dark"
How dynamic color is resolved
iOS uses UITraitCollection to represents interface environment values
The iOS trait environment is exposed though the traitCollection property of the UITraitEnvironment protocol. This protocol is adopted by the following classes: UIScreen, UIWindow, UIViewController, UIPresentationController, and UIView.
When user changes system appearance
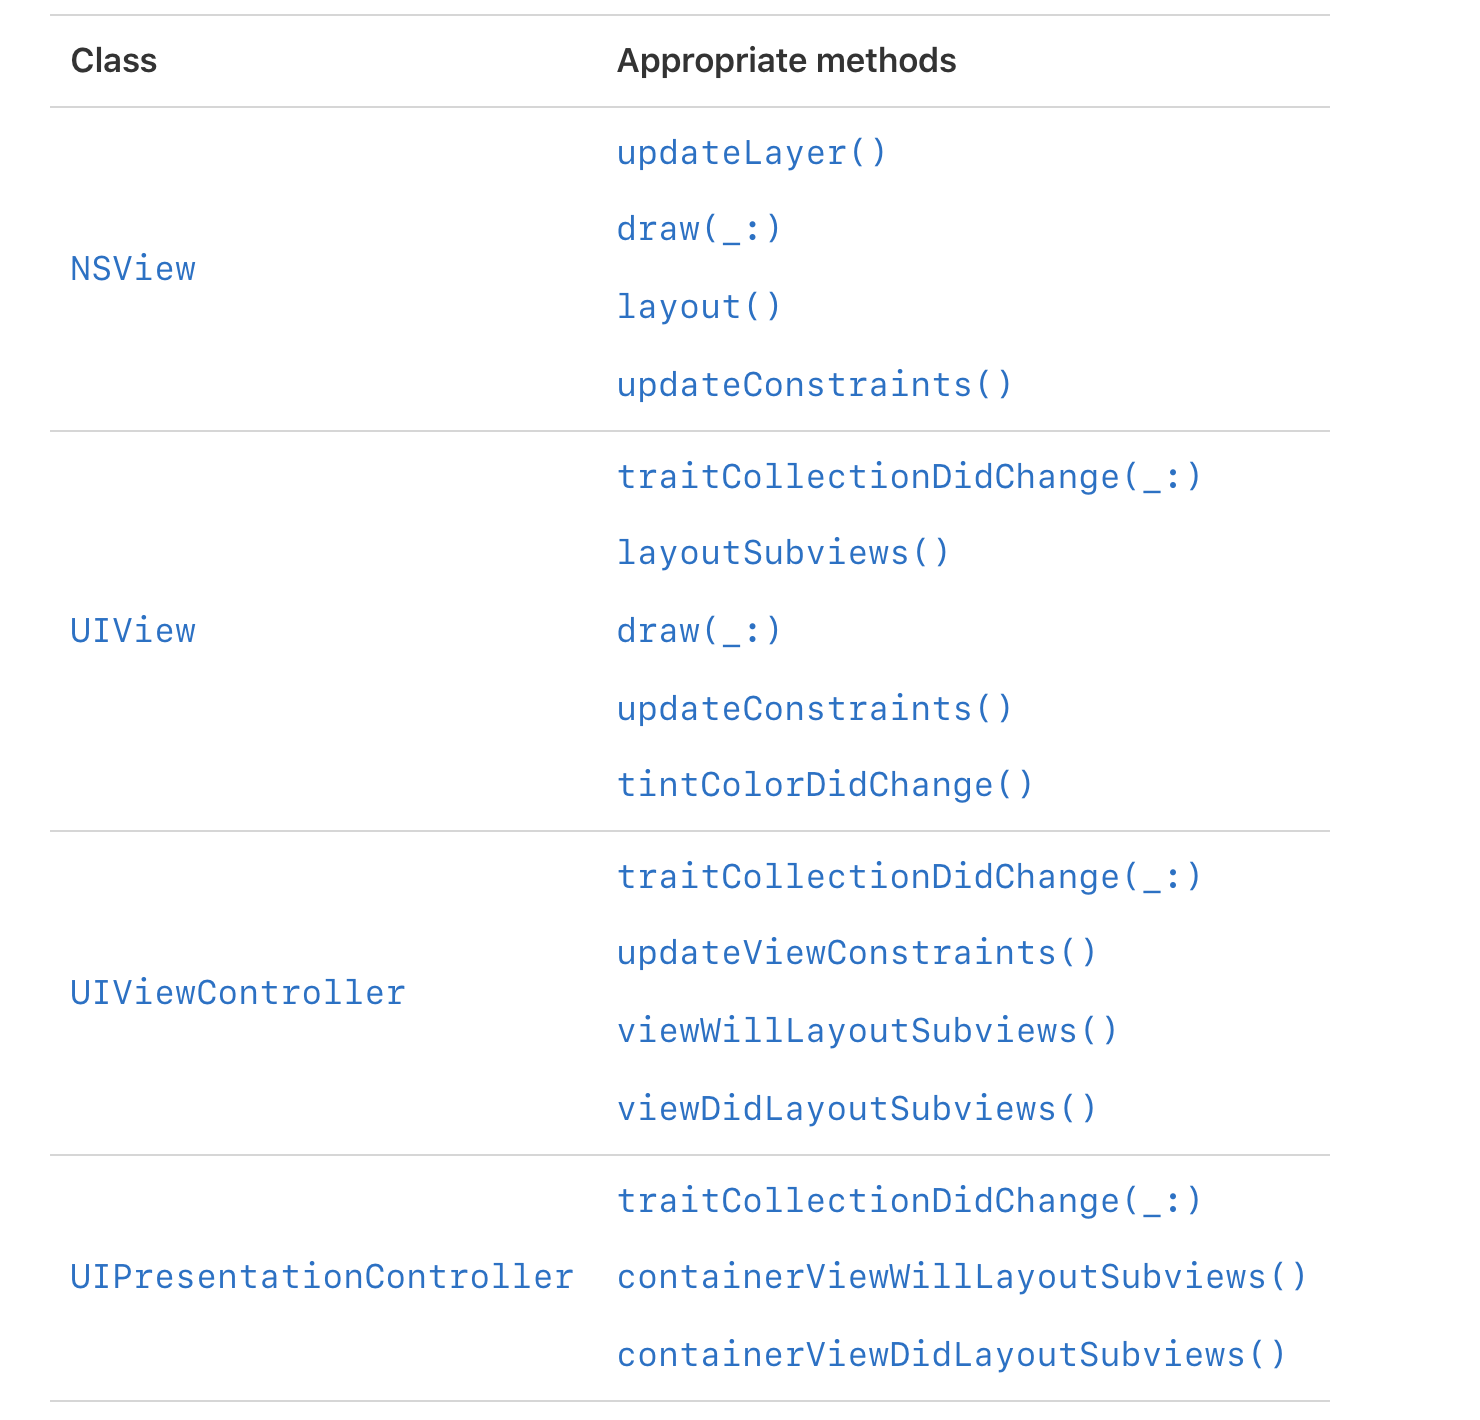
From Update Custom Views Using Specific Methods
When the user changes the system appearance, the system automatically asks each window and view to redraw itself. During this process, the system calls several well-known methods for both macOS and iOS, listed in the following table, to update your content. The system updates the trait environment before calling these methods, so if you make all of your appearance-sensitive changes in them, your app updates itself correctly.
Before calling these method, iOS updates UITraitCollection.current
UIKit updates the value of this property before calling several well-known methods of UIView, UIViewController, and UIPresentationController. The trait collection contains a complete set of trait values describing the current environment, and does not include unspecified or unknown values.
UIKit stores the value for this property as a thread-local variable, so access to it is fast. Also, changing the traits on a nonmain thread does not affect the current traits on your app’s main thread.
Outside of popular UIKit methods
You see from above that iOS set UITraitCollection.current correctly before common methods like draw, layoutSubviews , tintColorDidChange, viewWillLayoutSubviews , …
The section Update Custom Views Using Specific Methods has a note about using trait collection outside those methods
If you make appearance-sensitive changes outside of these methods, your app may not draw its content correctly for the current environment. The solution is to move your code into these methods. For example, instead of setting the background color of an NSView object’s layer at creation time, move that code to your view’s updateLayer() method instead, as shown in the code example below. Setting the background color at creation time might seem appropriate, but because CGColor objects do not adapt, setting it at creation time leaves the view with a fixed background color that never changes. Moving your code to updateLayer() refreshes that background color whenever the environment changes.
override func updateLayer() {
   self.layer?.backgroundColor = NSColor.textBackgroundColor.cgColor

   // Other updates.
}
When we access UIColor or its cgColor, iOS resolves it using current trait collection
If we want to use traitCollection other places, we can use performAsCurrent
Use this method when you want to execute code using a set of traits that differ from those in the current trait environment. For example, you might use this method to draw part of a view’s content with a different set of traits. This method temporarily replaces the traits of the current environment with the ones found in the current UITraitCollection. After the actions block finishes, the method restores the original traits to the environment.
When the cgColor property is accessed on a UIColor, iOS uses UITraitCollection.current to return a static color
let myCellBorderColor: UIColor =
myCustomTraitCollection.performAsCurrent {
    layer.borderColor = myCellBorderColor.cgColor
}
You can call this method from any thread of your app.
We can also use resolvedColor to return the version of the current color that results from the specified traits.
let myCellBorderColor: UIColor =
layer.borderColor = myCellBorderColor.resolvedColor(with: myCustomTraitCollection).cgColor
Note that this is static, to be notified when appearance changes, we need to listen to traitCollectionDidChange
The system calls this method when the iOS interface environment changes. Implement this method in view controllers and views, according to your app’s needs, to respond to such changes. For example, you might adjust the layout of the subviews of a view controller when an iPhone is rotated from portrait to landscape orientation. The default implementation of this method is empty.
UIView and CALayer
Let’s examine what we have learned with playground of a square UIView and a round CALayer
import UIKit

class ViewController: UIViewController {
    override func viewDidLoad() {
        super.viewDidLoad()

        view.backgroundColor = UIColor.systemGroupedBackground

        let color = UIColor(dynamicProvider: { traitCollection in
            switch traitCollection.userInterfaceStyle {
            case .dark:
                return UIColor.yellow
            case .light:
                return UIColor.blue
            case .unspecified:
                return UIColor.clear
            }
        })

        let view = UIView(frame: CGRect(x: 50, y: 50, width: 100, height: 100))
        view.backgroundColor = color
        self.view.addSubview(view)

        let layer = CAShapeLayer()
        layer.backgroundColor = color.cgColor
        layer.frame = CGRect(x: 150, y: 150, width: 50, height: 50)
        layer.cornerRadius = 25

        self.view.layer.addSublayer(layer)
    }
}
Where does traitCollection in UIColor(dynamicProvider come from? It comes from UITraitCollection.current which is set by iOS whenever trait collection changes. You can verify that in traitCollectionDidChange
override func traitCollectionDidChange(_ previousTraitCollection: UITraitCollection?) {
    print(traitCollection.userInterfaceStyle.rawValue)
    print(UITraitCollection.current.userInterfaceStyle.rawValue)
}
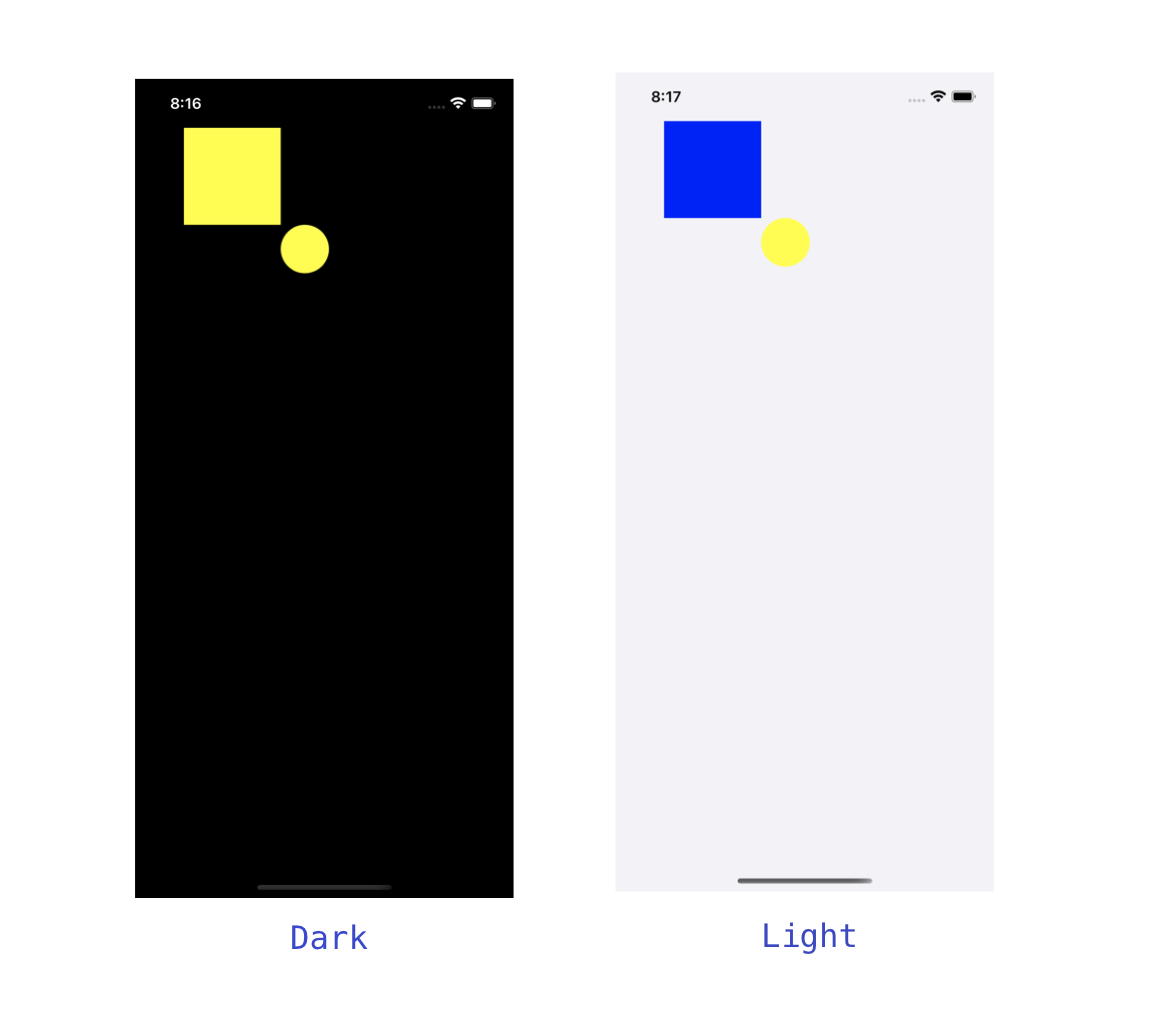
We run the app firstly in dark mode, then switch to light. We use a dynamic color that renders in yellow in dark mode, and blue in light mode.
Here is the UI in light and dark mode. UIView can adapt its color because UITraitCollection is a UIView concept only. The UIView is told to redrawn upon trait collection changes. Remember: When the user changes the system appearance, the system automatically asks each window and view to redraw itself
Whereas the round CALayer keeps the same yellow color when we first launch the app in dark mode.
How to override trait collections
From Override the Interface Style for a Window, View, or View Controller
Overriding the interface style affects other objects in your interface as follows:
- View controllers: The view controller’s views and child view controllers adopt the style.
- Views: The view and all of its subviews adopt the style.
- Windows: Everything in the window adopts the style, including the root view controller and all presentation controllers that display content in that window.
override func viewDidLoad() {
    super.viewDidLoad()

    // Always adopt a light interface style.
    overrideUserInterfaceStyle = .light
}
Start the conversation