
Issue #258
I started iOS development when iOS 7 had been announced. And I have learned a bit, through working, advice from colleagues and the iOS community.
In this article, I’d like to share a lot of good practices by taking the example of a simple recipes app. The source code is at GitHub Recipes.
The app is a traditional master detail application that showcases a list of recipes together with their detailed information.
There are thousands of ways to solve a problem, and the way a problem is tackled also depends on personal taste. Hopefully, throughout this article you’ll learn something useful — I did learn a lot when I did this project.
I’ve added links to some keywords where I felt further reading would be beneficial. So definitely check them out. Any feedback is welcome.
So let’s get started…
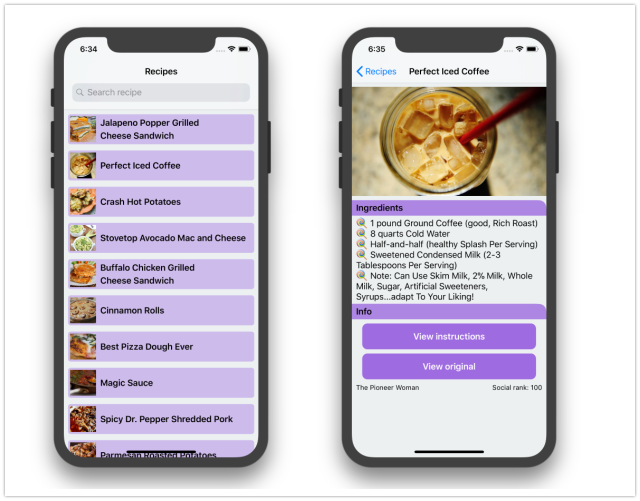
Here is a high level overview of what you’ll be building.
Getting started
Let’s decide on the tool and project settings that we use.
Xcode and Swift version
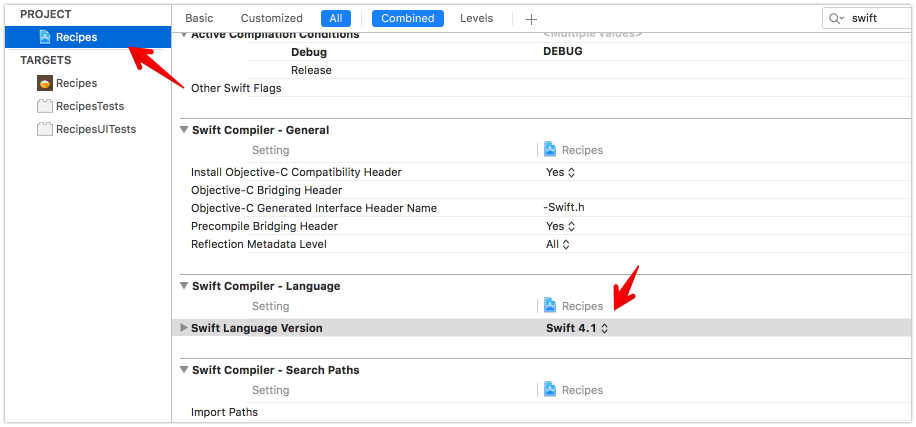
At WWDC 2018, Apple introduced Xcode 10 with Swift 4.2. However, at the time of writing, Xcode 10 is still in beta 5. So let’s stick with the stable Xcode 9 and Swift 4.1. Xcode 4.2 has some cool features — you can play with it through this awesome Playground. It does not introduce huge changes from Swift 4.1, so we can easily update our app in the near future if required.
You should set the Swift version in the Project setting instead of the target settings. This means all targets in the project share the same Swift version (4.1).
Minimum iOS version to support
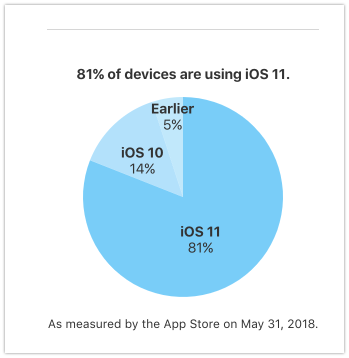
As of summer 2018, iOS 12 is in public beta 5 and we can’t target iOS 12 without Xcode 10. In this post, we use Xcode 9 and the base SDK is iOS 11. Depending on the requirement and user bases, some apps need to support old iOS versions. Although iOS users tend to adopt new iOS versions faster than those who use Android, there are a some that stay with old versions. According to Apples advice, we need to support the two most recent versions, which are iOS 10 and iOS 11. As measured by the App Store on May 31, 2018, only 5% of users use iOS 9 and prior.
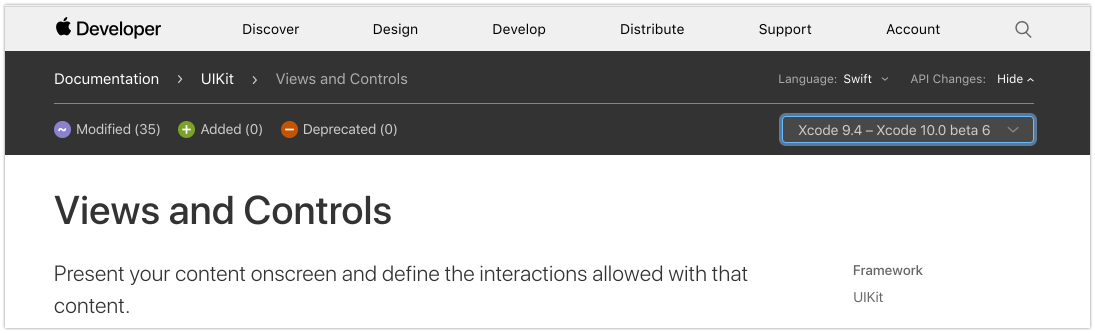
Targeting new iOS versions means we can take advantages of new SDKs, which Apple engineers improve every year. The Apple developer website has an improved change log view. Now it is easier to see what has been added or modified.
Ideally, to determine when to drop support for old iOS versions, we need analytics about how users use our app.
Organising the Xcode project
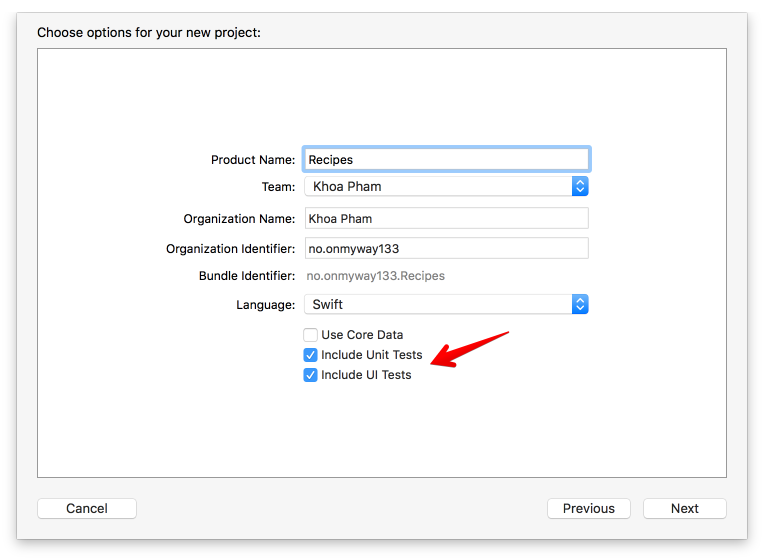
When we create the new project, select both “Include Unit Tests” and “Include UI Tests” as it a recommended practice to write tests early. Recent changes to the XCTest framework, especially in UI Tests, make testing a breeze and are pretty stable.
Before adding new files to the project, take a pause and think about the structure of your app. How do we want to organize the files? We have a few options. We can organize files by feature/module or role/types. Each has its pros and cons and I’ll discuss them below.
By role/type:
-
Pros: There is less thinking involved about where to put files. It’s also easier to apply scripts or filters.
-
Cons: It’s hard to correlate if we would want to find multiple files related to the same feature. It would also take time to reorganise files if we want to make them into reusable components in the future.
By feature/module
-
Pros: It makes everything modular and encourages composition.
-
Cons: It may get messy when many files of different types are bundled together.
Staying modular
Personally, I try to organize my code by features/components as much as possible. This makes it easier to identify related code to fix, and to add new features easier in the future. It answers the question “What does this app do?” instead of “What is this file?” Here is a good article regarding this.
A good rule of thumb is to stay consistent, no matter which structure you choose. 👍
Recipes app structure
The following is the app structure that our recipe app uses:
Source
Contains source code files, split into components:
-
Features: the main features in the app
-
Home: the home screen, showing a list of recipes and an open search
-
List: shows a list of recipes, including reloading a recipe and showing an empty view when a recipe does not exist
-
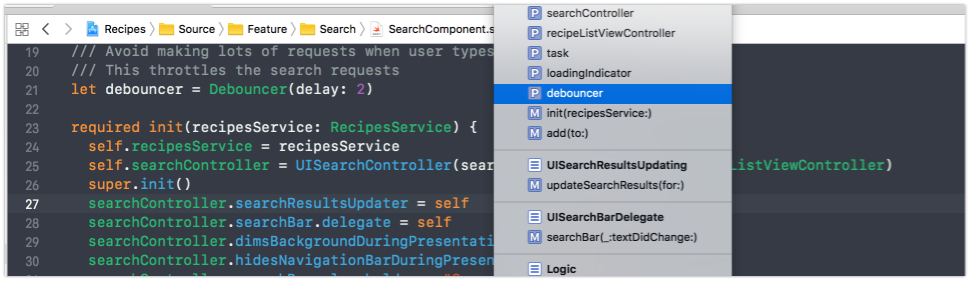
Search: handle search and debouncing
-
Detail: shows detail information
Library
Contains the core components of our application:
-
Flow: contains FlowController to manage flows
-
Adapter: generic data source for UICollectionView
-
Extension: convenient extensions for common operations
-
Model: The model in the app, parsed from JSON
Resource
Contains plist, resource, and Storyboard files.
Code conventions
I agree with most of the style guides in raywenderlich/swift-style-guide and github/swift-style-guide. These are straightforward and reasonable to use in a Swift project. Also, check out the official API Design Guidelines made by the Swift team at Apple on how to write better Swift code.
Whichever style guide you choose to follow, code clarity must be your most important goal.
Indentation and the tab-space war is a sensitive topic, but again, it depends on taste. I use four spaces indentation in Android projects, and two spaces in iOS and React. In this Recipes app, I follow consistent and easy-to-reason indentation, which I have written about here and here.
Documentation
Good code should explain itself clearly so you don’t need to write comments. If a chunk of code is hard to understand, it’s good to take a pause and refactor it to some methods with descriptive names so it’s the chunk of code is more clear to understand. However, I find documenting classes and methods are also good for your coworkers and future self. According to the Swift API design guidelines,
Write a documentation comment for every declaration. Insights gained by writing documentation can have a profound impact on your design, so don’t put it off.
It’s very easy to generate comment template /// in Xcode with Cmd+Alt+/ . If you plan to refactor your code to a framework to share with others in the future, tools like jazzy can generate documentation so other people can follow along.
Marking sections of code
The use of MARK can be helpful to separate sections of code. It also groups functions nicely in the Navigation Bar. You can also use extension groups, related properties and methods.
For a simple UIViewController we can possible define the following MARKs:
// MARK: - Init
// MARK: - View life cycle
// MARK: - Setup
// MARK: - Action
// MARK: - Data
Source control
Git is a popular source control system right now. We can use the template .gitignore file from gitignore.io/api/swift. There are both pros and cons in checking in dependencies files (CocoaPods and Carthage). It depends on your project, but I tend to not commit dependencies (node_modules, Carthage, Pods) in source control to not clutter the code base. It also makes reviewing Pull requests easier.
Whether or not you check in the Pods directory, the Podfile and Podfile.lock should always be kept under version control.
I use both iTerm2 to execute commands and Source Tree to view branches and staging.
Dependencies
I have used third party frameworks, and also made and contributed to open source a lot. Using a framework gives you a boost at the start, but it can also limit you a lot in the future. There may be some trivial changes that are very hard to work around. The same thing happens when using SDKs. My preference is to pick active open source frameworks. Read the source code and check frameworks carefully, and consult with your team if you plan to use them. A bit of extra caution does no harm.
In this app, I try to use as few dependencies as possible. Just enough to demonstrate how to manage dependencies. Some experienced developers may prefer Carthage, a dependency manager as it gives you complete control. Here I choose CocoaPods because its easy to use, and it has worked great so far.
There’s a file called .swift-version of value 4.1 in the root of the project to tell CocoaPods that this project uses Swift 4.1. This looks simple but took me quite some time to figure out. ☹️
Getting into the project
Let’s craft some launch images and icons to give the project a nice look.
API
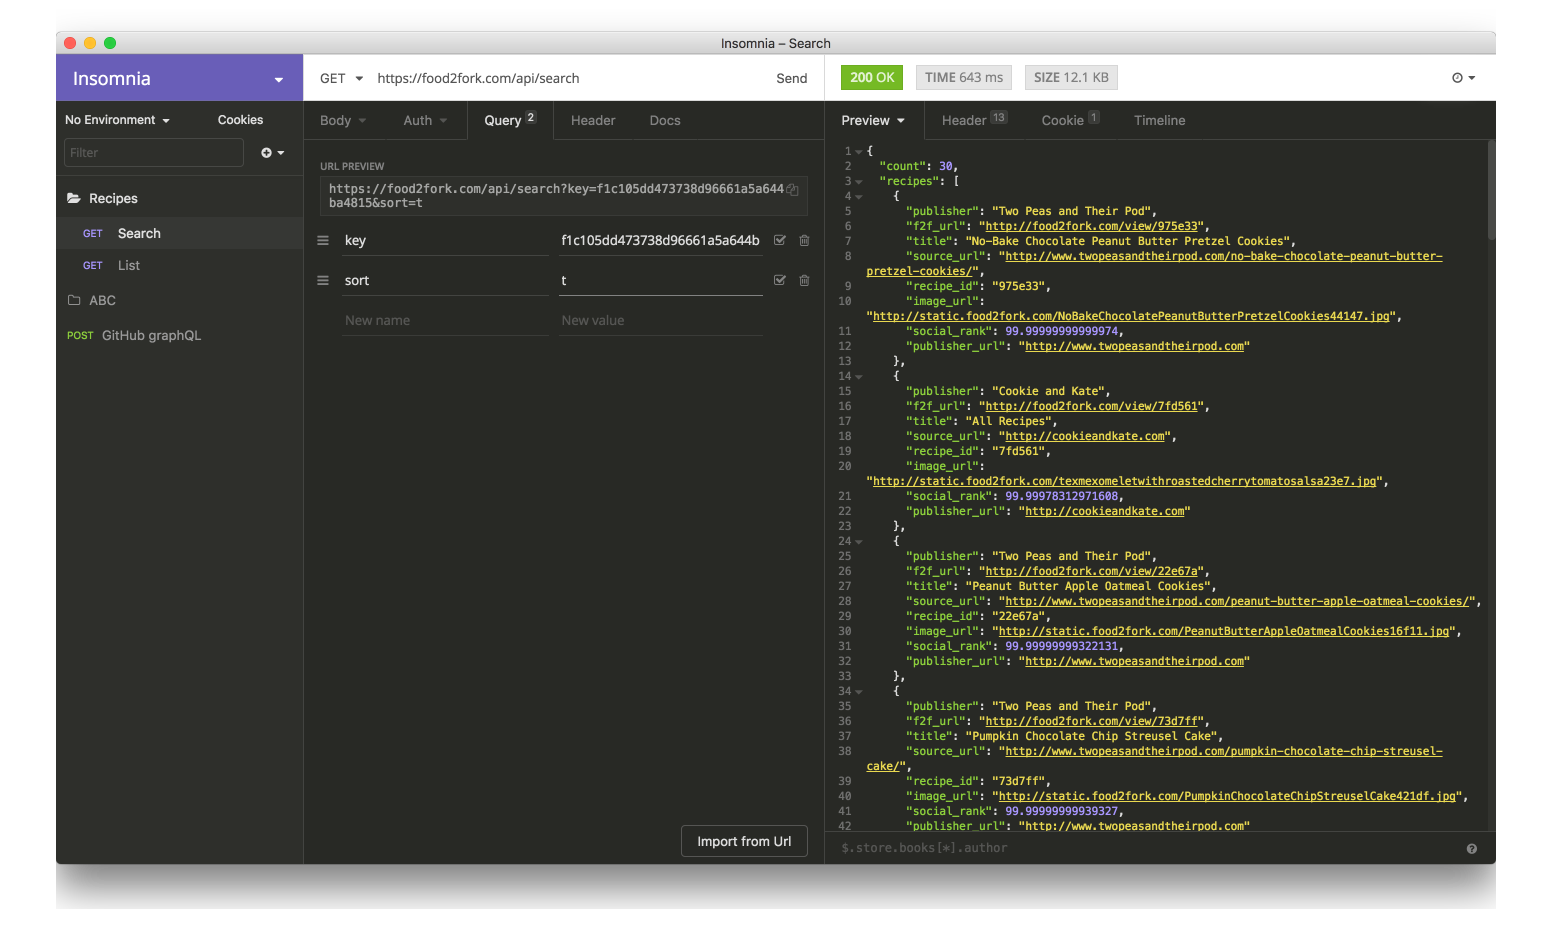
The easy way to learn iOS networking is through public free API services. Here I use food2fork. You can register for an account at http://food2fork.com/about/api. There are many other awesome APIs in this public-api repository.
It’s good to keep your credentials in a safe place. I use 1Password to generate and store my passwords.
Before we start coding, let’s play with the APIs to see which kinds of requests they require and responses they return. I use the Insomnia tool to test and analyze API responses. It’s open source, free, and works great. 👍
Launch screen
The first impression is important, so is the Launch Screen. The preferred way is using LaunchScreen.storyboard instead of a static Launch image.
To add a launch image to Asset Catalog, open LaunchScreen.storyboard, add UIImageView , and pin it to the edges of UIView. We should not pin the image to the Safe Area as we want the image to be full screen. Also, unselect any margins in the Auto Layout constraints. Set the contentMode of the UIImageView as Aspect Fill so it stretches with the correct aspect ratio.
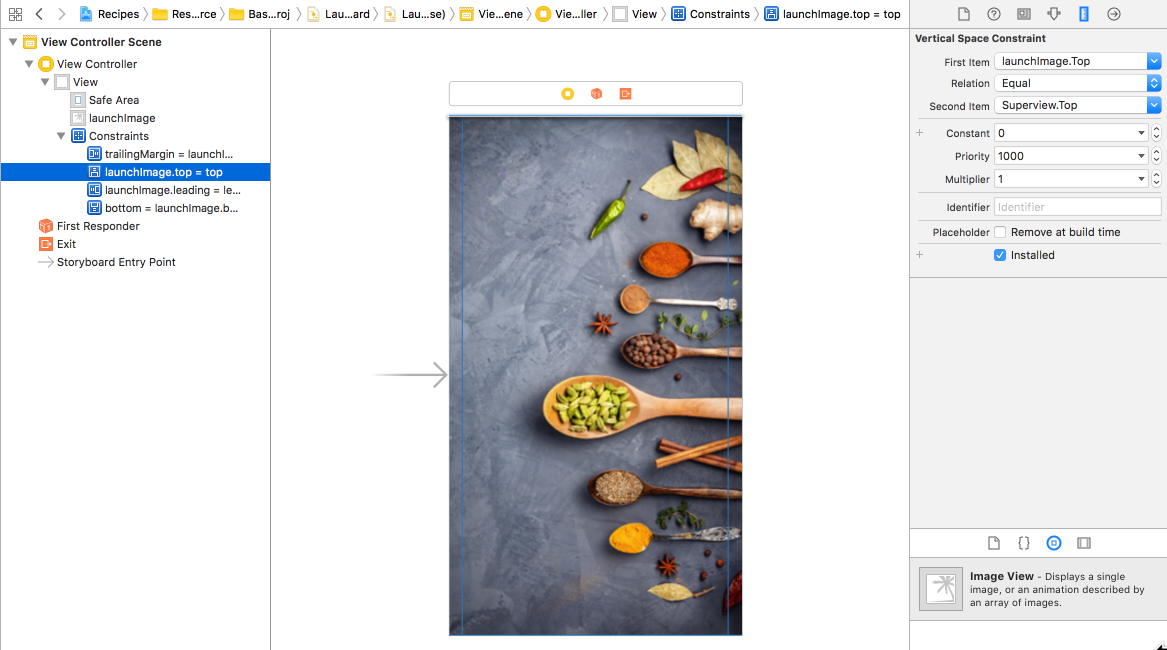 Configure layout in LaunchScreen.
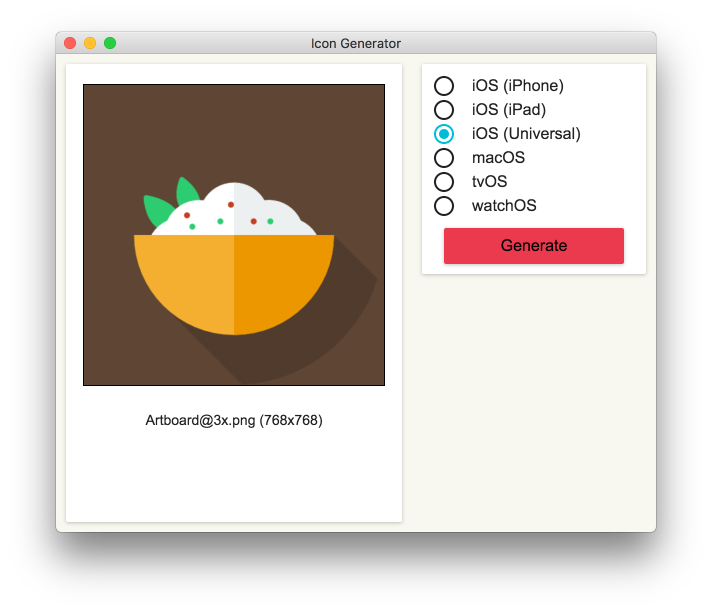
App icon
A good practice is to provide all the necessary app icons for each device that you support, and also for places like Notification, Settings, and Springboard. Make sure each image has no transparent pixels, otherwise it results in a black background. This tip is from Human Interface Guidelines - App Icon.
Keep the background simple and avoid transparency. Make sure your icon is opaque, and don’t clutter the background. Give it a simple background so it doesn’t overpower other app icons nearby. You don’t need to fill the entire icon with content.
We need to design square images with a size greater than 1024 x 1024 so each is able to downscale to smaller images. You can do this by hand, script, or use this small IconGenerator app that I made.
The IconGenerator app can generate icons for iOS in iPhone, iPad, macOS and watchOS apps. The result is the AppIcon.appiconset that we can drag right into the Asset Catalog. Asset Catalog is the way to go for modern Xcode projects.
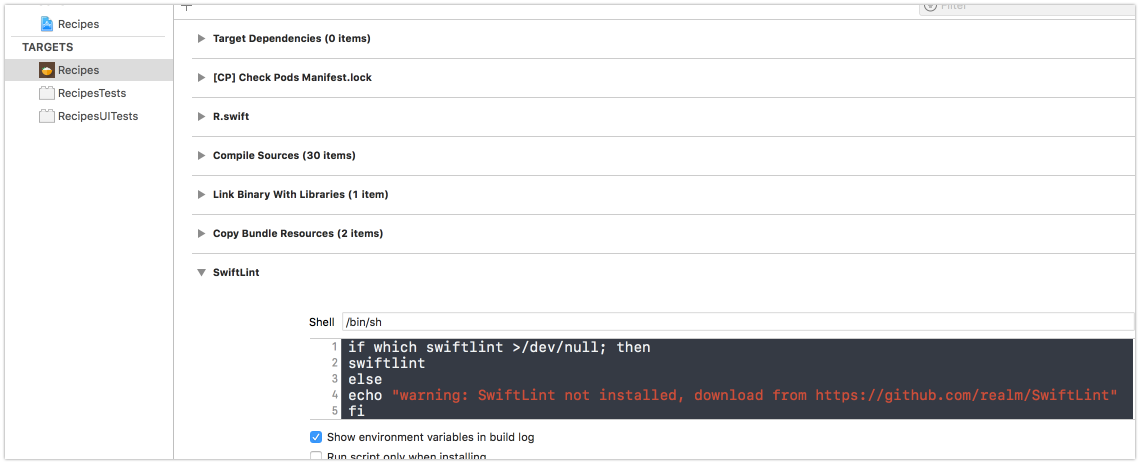
Linting code with SwiftLint
Regardless of what platform we develop on, it’s good to have a linter to enforce consistent conventions. The most popular tool for Swift projects is SwiftLint, made by the awesome people at Realm.
To install it, add pod ‘SwiftLint’, ‘~> 0.25’ to the Podfile. It’s also a good practice to specify the version of the dependencies so pod install won’t accidentally update to a major version that could break your app. Then add a .swiftlint.yml with your preferred configuration. A sample configuration can be found here.
Finally, add a new Run Script Phrase to execute swiftlint after compiling.
Type-safe resource
I use R.swift to safely manage resources. It can generate type-safe classes to access font, localisable strings, and colors. Whenever we change resource file names, we get compile errors instead of a implicit crash. This prevents us inferring with resources that are actively in use.
imageView.image = R.image.notFound()
Show me the code
Let’s dive into the code, starting with the model, flow controllers and service classes.
Designing the model
It may sound boring but clients are just a prettier way to represent the API response. The model is perhaps the most basic thing and we use it a lot in the app. It plays such an important role but there can be some obvious bugs related to malformed models and assumptions about how a model should be parsed that need to be considered.
We should test for every model of the app. Ideally, we need automated testing of models from API responses in case the model has changed from the backend.
Starting from Swift 4.0, we can conform our model to Codable to easily serialise to and from JSON. Our Model should be immutable:
struct Recipe: Codable {
  let publisher: String
  let url: URL
  let sourceUrl: String
  let id: String
  let title: String
  let imageUrl: String
  let socialRank: Double
  let publisherUrl: URL

enum CodingKeys: String, CodingKey {
    case publisher
    case url = "f2f_url"
    case sourceUrl = "source_url"
    case id = "recipe_id"
    case title
    case imageUrl = "image_url"
    case socialRank = "social_rank"
    case publisherUrl = "publisher_url"
  }
}
We can use some test frameworks if you like fancy syntax or an RSpec style. Some third party test frameworks may have issues. I find XCTest good enough.
import XCTest
@testable import Recipes

class RecipesTests: XCTestCase {
  func testParsing() throws {
    let json: [String: Any] = [
      "publisher": "Two Peas and Their Pod",
      "f2f_url": "http://food2fork.com/view/975e33",
      "title": "No-Bake Chocolate Peanut Butter Pretzel Cookies",
      "source_url": "http://www.twopeasandtheirpod.com/no-bake-chocolate-peanut-butter-pretzel-cookies/",
      "recipe_id": "975e33",
      "image_url": "http://static.food2fork.com/NoBakeChocolatePeanutButterPretzelCookies44147.jpg",
      "social_rank": 99.99999999999974,
      "publisher_url": "http://www.twopeasandtheirpod.com"
    ]

let data = try JSONSerialization.data(withJSONObject: json, options: [])
    let decoder = JSONDecoder()
    let recipe = try decoder.decode(Recipe.self, from: data)

XCTAssertEqual(recipe.title, "No-Bake Chocolate Peanut Butter Pretzel Cookies")
    XCTAssertEqual(recipe.id, "975e33")
    XCTAssertEqual(recipe.url, URL(string: "http://food2fork.com/view/975e33")!)
  }
}
Better navigation with FlowController
Before, I used Compass as a routing engine in my projects, but over time I’ve found that writing simple Routing code works too.
The FlowController is used to manage many UIViewController related components to a common feature. You may want to read FlowController and Coordinator for other use cases and to get a better understanding.
There is the AppFlowController that manages changing rootViewController. For now it starts the RecipeFlowController.
window = UIWindow(frame: UIScreen.main.bounds)
window?.rootViewController = appFlowController
window?.makeKeyAndVisible()
appFlowController.start()
RecipeFlowController manages (in fact it is) the UINavigationController, that handles pushing HomeViewController, RecipesDetailViewController, SafariViewController.
final class RecipeFlowController: UINavigationController {
  /// Start the flow
  func start() {
    let service = RecipesService(networking: NetworkService())
    let controller = HomeViewController(recipesService: service)
    viewControllers = [controller]
    controller.select = { [weak self] recipe in
      self?.startDetail(recipe: recipe)
    }
  }

private func startDetail(recipe: Recipe) {}
  private func startWeb(url: URL) {}
}
The UIViewController can use delegate or closure to notify FlowController about changes or next screens in the flow. For delegate there may be a need to check when there are two instances of the same class. Here we use closurefor simplicity.
Auto Layout
Auto Layout has been around since iOS 5, it gets better each year. Although some people still have a problem with it, mostly because of confusing breaking constraints and performance, but personally, I find Auto Layout to be good enough.
I try to use Auto Layout as much as possible to make an adaptive UI. We can use libraries like Anchors to do declarative and fast Auto Layout. However in this app, we’ll just use the NSLayoutAnchor since it is from iOS 9. The code below is inspired by Constraint. Remember that Auto Layout in its simplest form involves toggling translatesAutoresizingMaskIntoConstraints and activating isActive constraints.
extension NSLayoutConstraint {
  static func activate(_ constraints: [NSLayoutConstraint]) {
    constraints.forEach {
      ($0.firstItem as? UIView)?.translatesAutoresizingMaskIntoConstraints = false
      $0.isActive = true
    }
  }
}
There are actually many other layout engines available on GitHub. To get a sense over which one would be suitable to use, check out the LayoutFrameworkBenchmark.

Architecture
Architecture is probably the most hyped and discussed topic. I’m a fan of exploring architectures, you can view more posts and frameworks about different architectures here.
To me, all architectures and patterns define roles for each object and how to connect them. Remember these guiding principles for your choice of architecture:
-
encapsuate what varies
-
favor composition over inheritance
-
program to interface, not to implementation
After playing around with many different architectures, with and without Rx, I found out that simple MVC is good enough. In this simple project, there is just UIViewController with logic encapsulated in helper Service classes,
Massive View Controller
You may have heard people joking about how massive UIViewController is, but in reality, there is no massive view controller. It’s just us writing bad code. However there are ways to slim it down.
In the recipes app I use,
-
Service to inject into the view controller to perform a single task
-
Generic View to move view and controls declaration to the View layer
-
Child view controller to compose child view controllers to build more features
Here is a very good article with 8 tips to slim down big controllers.
Access Control
The SWIFT documentation mentions that “access control restricts access to parts of your code from code in other source files and modules. This feature enables you to hide the implementation details of your code, and to specify a preferred interface through which that code can be accessed and used.”
Everything should be private and final by default. This also helps the compiler. When seeing a public property, we need to search for it across the project before doing anything further with it. If the property is used only within a class, making it private means we don’t need to care if it breaks elsewhere.
Declare properties as final where possible.
final class HomeViewController: UIViewController {}
Declare properties as private or at least private(set).
final class RecipeDetailView: UIView {
  private let scrollableView = ScrollableView()
  private(set) lazy var imageView: UIImageView = self.makeImageView()
}
Lazy properties
For properties that can be accessed at a later time, we can declare them as lazyand can use closure for fast construction.
final class RecipeCell: UICollectionViewCell {
  private(set) lazy var containerView: UIView = {
    let view = UIView()
    view.clipsToBounds = true
    view.layer.cornerRadius = 5
    view.backgroundColor = Color.main.withAlphaComponent(0.4)

return view
  }()
}
We can also use make functions if we plan to reuse the same function for multiple properties.
final class RecipeDetailView: UIView {
  private(set) lazy var imageView: UIImageView = self.makeImageView()

private func makeImageView() -> UIImageView {
    let imageView = UIImageView()
    imageView.contentMode = .scaleAspectFill
    imageView.clipsToBounds = true
    return imageView
  }
}
This also matches advice from Strive for Fluent Usage.
Begin names of factory methods with “make”, For example, x.makeIterator().
Code snippets
Some code syntax is hard to remember. Consider using code snippets to auto generate code. This is supported by Xcode and is the preferred way by Apple engineers when they demo.
if #available(iOS 11, *) {
  viewController.navigationItem.searchController = searchController
  viewController.navigationItem.hidesSearchBarWhenScrolling = false
} else {
  viewController.navigationItem.titleView = searchController.searchBar
}
I made a repo with some useful Swift snippets that many enjoy using.
Networking
Networking in Swift is kind of a solved problem. There are tedious and error-prone tasks like parsing HTTP responses, handling request queues, handling parameter queries. I’ve seen bugs about PATCH requests, lowercased HTTP methods, … We can just use Alamofire. There’s no need to waste time here.
For this app, since it’s simple and to avoid unnecessary dependencies. We can just use URLSession directly. A resource usually contains URL, path, parameters and the HTTP method.
struct Resource {
  let url: URL
  let path: String?
  let httpMethod: String
  let parameters: [String: String]
}
A simple network service can just parse Resource to URLRequest and tells URLSession to execute
final class NetworkService: Networking {
  @discardableResult func fetch(resource: Resource, completion: @escaping (Data?) -> Void) -> URLSessionTask? {
    guard let request = makeRequest(resource: resource) else {
      completion(nil)
      return nil
    }

let task = session.dataTask(with: request, completionHandler: { data, _, error in
      guard let data = data, error == nil else {
        completion(nil)
        return
      }

completion(data)
    })

task.resume()
    return task
  }
}
Use dependency injection. Allow caller to specify URLSessionConfiguration. Here we make use of Swift default parameter to provide the most common option.
init(configuration: URLSessionConfiguration = URLSessionConfiguration.default) {
  self.session = URLSession(configuration: configuration)
}
I also use URLQueryItem which was from iOS 8. It makes parsing parameters to query items nice and less tedious.
How to test Networking code
We can use URLProtocol and URLCache to add a stub for network responses or we can use frameworks like Mockingjay which swizzles URLSessionConfiguration.
I myself prefer using the protocol to test. By using the protocol, the test can create a mock request to provide a stub response.
protocol Networking {
  @discardableResult func fetch(resource: Resource, completion: @escaping (Data?) -> Void) -> URLSessionTask?
}

final class MockNetworkService: Networking {
  let data: Data
  init(fileName: String) {
    let bundle = Bundle(for: MockNetworkService.self)
    let url = bundle.url(forResource: fileName, withExtension: "json")!
    self.data = try! Data(contentsOf: url)
  }

func fetch(resource: Resource, completion: @escaping (Data?) -> Void) -> URLSessionTask? {
    completion(data)
    return nil
  }
}
Implementing cache for offline support
I used to contribute and use a library called Cache a lot. What we need from a good cache library is memory and disk cache, memory for fast access, disk for persistency. When we save, we save to both memory and disk. When we load, if memory cache fails, we load from disk, then update memory again. There are many advanced topics about cache like purging, expiry, access frequency. Have a read about them here.
In this simple app, a homegrown cache service class is enough and a good way to learn how caching works. Everything in Swift can be converted to Data, so we can just save Data to cache. Swift 4 Codable can serialize object to Data.
The code below shows us how to use FileManager for disk cache.
/// Save and load data to memory and disk cache
final class CacheService {

/// For get or load data in memory
  private let memory = NSCache<NSString, NSData>()

/// The path url that contain cached files (mp3 files and image files)
  private let diskPath: URL

/// For checking file or directory exists in a specified path
  private let fileManager: FileManager

/// Make sure all operation are executed serially
  private let serialQueue = DispatchQueue(label: "Recipes")

init(fileManager: FileManager = FileManager.default) {
    self.fileManager = fileManager
    do {
      let documentDirectory = try fileManager.url(
        for: .documentDirectory,
        in: .userDomainMask,
        appropriateFor: nil,
        create: true
      )
      diskPath = documentDirectory.appendingPathComponent("Recipes")
      try createDirectoryIfNeeded()
    } catch {
      fatalError()
    }
  }

func save(data: Data, key: String, completion: (() -> Void)? = nil) {
    let key = MD5(key)

serialQueue.async {
      self.memory.setObject(data as NSData, forKey: key as NSString)
      do {
        try data.write(to: self.filePath(key: key))
        completion?()
      } catch {
        print(error)
      }
    }
  }
}
To avoid malformed and very long file names, we can hash them. I use MD5 from SwiftHash, which gives dead simple usage let key = MD5(key).
How to test Cache
Since I design Cache operations to be asynchronous, we need to use test expectation. Remember to reset the state before each test so the previous test state does not interfere with the current test. The expectation in XCTestCase makes testing asynchronous code easier than ever. 👍
class CacheServiceTests: XCTestCase {
  let service = CacheService()

override func setUp() {
    super.setUp()

try? service.clear()
  }

func testClear() {
    let expectation = self.expectation(description: #function)
    let string = "Hello world"
    let data = string.data(using: .utf8)!

service.save(data: data, key: "key", completion: {
      try? self.service.clear()
      self.service.load(key: "key", completion: {
        XCTAssertNil($0)
        expectation.fulfill()
      })
    })

wait(for: [expectation], timeout: 1)
  }
}
Loading remote Images
I also contribute to Imaginary so I know a bit about how it works. For remote images, we need to download and cache it, and the cache key is usually the URL of the remote image.
In our recipese app, let’s build a simple ImageService based on our NetworkService and CacheService. Basically an image is just a network resource that we download and cache. We prefer composition so we’ll include NetworkService and CacheService into ImageService.
/// Check local cache and fetch remote image
final class ImageService {

private let networkService: Networking
  private let cacheService: CacheService
  private var task: URLSessionTask?

init(networkService: Networking, cacheService: CacheService) {
    self.networkService = networkService
    self.cacheService = cacheService
  }
}
We usually have UICollectionViewand UITableView cells with UIImageView. And since cells are reused, we need to cancel any existing request task before making a new request.
func fetch(url: URL, completion: @escaping (UIImage?) -> Void) {
  // Cancel existing task if any
  task?.cancel()

// Try load from cache
  cacheService.load(key: url.absoluteString, completion: { [weak self] cachedData in
    if let data = cachedData, let image = UIImage(data: data) {
      DispatchQueue.main.async {
        completion(image)
      }
    } else {
      // Try to request from network
      let resource = Resource(url: url)
      self?.task = self?.networkService.fetch(resource: resource, completion: { networkData in
        if let data = networkData, let image = UIImage(data: data) {
          // Save to cache
          self?.cacheService.save(data: data, key: url.absoluteString)
          DispatchQueue.main.async {
            completion(image)
          }
        } else {
          print("Error loading image at \(url)")
        }
      })

self?.task?.resume()
    }
  })
}
Making image loading more convenient for UIImageView
Let’s add an extension to UIImageView to set the remote image from the URL. I use associated object to keep this ImageService and to cancel old requests. We make good use of associated object to attach ImageService to UIImageView. The point is to cancel the current request when the request is triggered again. This is handy when the image views are rendered in a scrolling list.
extension UIImageView {
  func setImage(url: URL, placeholder: UIImage? = nil) {
    if imageService == nil {
      imageService = ImageService(networkService: NetworkService(), cacheService: CacheService())
    }

self.image = placeholder
    self.imageService?.fetch(url: url, completion: { [weak self] image in
      self?.image = image
    })
  }

private var imageService: ImageService? {
    get {
      return objc_getAssociatedObject(self, &AssociateKey.imageService) as? ImageService
    }
    set {
      objc_setAssociatedObject(
        self,
        &AssociateKey.imageService,
        newValue,
        objc_AssociationPolicy.OBJC_ASSOCIATION_RETAIN_NONATOMIC
      )
    }
  }
}
Generic DataSource for UITableView and UICollectionView
We use UITableView and UICollectionView in almost in every app and almost perform the same thing repeatedly.
-
show refresh control while loading
-
reload list in case of data
-
show error in case of failure.
There are many wrappers around UITableView and UICollection. Each adds another layer of abstraction, which gives us more power but applies restrictions at the same time.
In this app, I use Adapter to get a generic data source, to make a type safe collection. Because, in the end, all we need is to map from the model to the cells.
I also utilize Upstream based on this idea. It’s hard to wrap around UITableView and UICollectionView, as many times, it is app specific, so a thin wrapper like Adapter is enough.
final class Adapter<T, Cell: UICollectionViewCell>: NSObject,
UICollectionViewDataSource, UICollectionViewDelegateFlowLayout {
  var items: [T] = []
  var configure: ((T, Cell) -> Void)?
  var select: ((T) -> Void)?
  var cellHeight: CGFloat = 60
}
Controller and View
I ditched Storyboard because of many limitations and many issues. Instead, I use code to make views and define constraints. It is not that hard to follow. Most of the boilerplate code in UIViewController is for creating views and configuring the layout. Let’s move those to the view. You can read more about that here.
/// Used to separate between controller and view
class BaseController<T: UIView>: UIViewController {
  let root = T()

override func loadView() {
    view = root
  }
}

final class RecipeDetailViewController: BaseController<RecipeDetailView> {}
Handling responsibilities with a child View Controller
The View controller container is a powerful concept. Each view controller has a separation of concern and can be composed together to create advanced features. I have used RecipeListViewController to manage the UICollectionView and show a list of recipes.
final class RecipeListViewController: UIViewController {
  private(set) var collectionView: UICollectionView!
  let adapter = Adapter<Recipe, RecipeCell>()
  private let emptyView = EmptyView(text: "No recipes found!")
}
There is the HomeViewController which embeds this RecipeListViewController
/// Show a list of recipes
final class HomeViewController: UIViewController {

/// When a recipe get select
  var select: ((Recipe) -> Void)?

private var refreshControl = UIRefreshControl()
  private let recipesService: RecipesService
  private let searchComponent: SearchComponent
  private let recipeListViewController = RecipeListViewController()
}
Composition and Dependency Injection
I try to build components and compose code whenever I can . We see that ImageService makes use of the NetworkService and CacheService, and RecipeDetailViewController makes use of Recipe and RecipesService
Ideally objects should not create dependencies by themselves. The dependencies should be created outside and passed down from root. In our app the root is AppDelegate and AppFlowController so dependencies should start from here.
App Transport Security

Since iOS 9, all apps should adopt App Transport Security
App Transport Security (ATS) enforces best practices in the secure connections between an app and its back end. ATS prevents accidental disclosure, provides secure default behavior, and is easy to adopt; it is also on by default in iOS 9 and OS X v10.11. You should adopt ATS as soon as possible, regardless of whether you’re creating a new app or updating an existing one.
In our app, some images are obtained over an HTTP connection. We need to exclude it from the security rule, but only for that domain only.
<key>NSAppTransportSecurity</key>
<dict>
  <key>NSExceptionDomains</key>
  <dict>
    <key>food2fork.com</key>
    <dict>
      <key>NSIncludesSubdomains</key>
      <true/>
      <key>NSExceptionAllowsInsecureHTTPLoads</key>
      <true/>
    </dict>
  </dict>
</dict>
A custom Scrollable View
For the detail screen, we can use UITableView and UICollectionView with different cell types. Here, the views should be static. We can stack using UIStackView. For more flexibility, we can just use UIScrollView.
/// Vertically layout view using Auto Layout in UIScrollView
final class ScrollableView: UIView {
  private let scrollView = UIScrollView()
  private let contentView = UIView()

override init(frame: CGRect) {
    super.init(frame: frame)

scrollView.showsHorizontalScrollIndicator = false
    scrollView.alwaysBounceHorizontal = false
    addSubview(scrollView)

scrollView.addSubview(contentView)

NSLayoutConstraint.activate([
      scrollView.topAnchor.constraint(equalTo: topAnchor),
      scrollView.bottomAnchor.constraint(equalTo: bottomAnchor),
      scrollView.leftAnchor.constraint(equalTo: leftAnchor),
      scrollView.rightAnchor.constraint(equalTo: rightAnchor),

contentView.topAnchor.constraint(equalTo: scrollView.topAnchor),
      contentView.bottomAnchor.constraint(equalTo: scrollView.bottomAnchor),
      contentView.leftAnchor.constraint(equalTo: leftAnchor),
      contentView.rightAnchor.constraint(equalTo: rightAnchor)
    ])
  }
}
We pin the UIScrollView to the edges. We pin the contentView left and right anchor to self, while pinning the contentView top and bottom anchor to UIScrollView.
The views inside contentView have top and bottom constraints, so when they expand, they expand contentView as well. UIScrollView uses Auto Layout info from this contentView to determine its contentSize. Here is how ScrollableView is used in RecipeDetailView.
scrollableView.setup(pairs: [
  ScrollableView.Pair(view: imageView, inset: UIEdgeInsets(top: 8, left: 0, bottom: 0, right: 0)),
  ScrollableView.Pair(view: ingredientHeaderView, inset: UIEdgeInsets(top: 8, left: 0, bottom: 0, right: 0)),
  ScrollableView.Pair(view: ingredientLabel, inset: UIEdgeInsets(top: 4, left: 8, bottom: 0, right: 0)),
  ScrollableView.Pair(view: infoHeaderView, inset: UIEdgeInsets(top: 4, left: 0, bottom: 0, right: 0)),
  ScrollableView.Pair(view: instructionButton, inset: UIEdgeInsets(top: 8, left: 20, bottom: 0, right: 20)),
  ScrollableView.Pair(view: originalButton, inset: UIEdgeInsets(top: 8, left: 20, bottom: 0, right: 20)),
  ScrollableView.Pair(view: infoView, inset: UIEdgeInsets(top: 16, left: 0, bottom: 20, right: 0))
])
Adding search functionality
From iOS 8 onwards, we can use the UISearchController to get a default search experience with the search bar and results controller. We’ll encapsuate search functionality into SearchComponent so that it can be pluggable.
final class SearchComponent: NSObject, UISearchResultsUpdating, UISearchBarDelegate {
  let recipesService: RecipesService
  let searchController: UISearchController
  let recipeListViewController = RecipeListViewController()
}
Starting from iOS 11, there ‘s a property called searchController on the UINavigationItem which makes it easy to show the search bar on the navigation bar.
func add(to viewController: UIViewController) {
  if #available(iOS 11, *) {
    viewController.navigationItem.searchController = searchController
    viewController.navigationItem.hidesSearchBarWhenScrolling = false
  } else {
    viewController.navigationItem.titleView = searchController.searchBar
  }

viewController.definesPresentationContext = true
}
In this app, we need to disable hidesNavigationBarDuringPresentation for now, as it is quite buggy. Hopefully it gets resolved in future iOS updates.
Understanding Presentation context
Understanding presentation context is crucial for view controller presentation. In search, we use the searchResultsController.
self.searchController = UISearchController(searchResultsController: recipeListViewController)
We need to use definesPresentationContext on the source view controller (the view controller where we add the search bar into). Without this we get the searchResultsController to be presented over full screen !!!
When using the currentContext or overCurrentContext style to present a view controller, this property controls which existing view controller in your view controller hierarchy is actually covered by the new content. When a context-based presentation occurs, UIKit starts at the presenting view controller and walks up the view controller hierarchy. If it finds a view controller whose value for this property is true, it asks that view controller to present the new view controller. If no view controller defines the presentation context, UIKit asks the window’s root view controller to handle the presentation. The default value for this property is false. Some system-provided view controllers, such as UINavigationController, change the default value to true.
Debouncing search actions
We should not execute search requests for every key stroke the user types in the search bar. Therefore some kind of throttling is needed. We can use DispatchWorkItem to encapsulate the action and send it to the queue. Later we can cancel it.
final class Debouncer {
  private let delay: TimeInterval
  private var workItem: DispatchWorkItem?

init(delay: TimeInterval) {
    self.delay = delay
  }

/// Trigger the action after some delay
  func schedule(action: @escaping () -> Void) {
    workItem?.cancel()
    workItem = DispatchWorkItem(block: action)
    DispatchQueue.main.asyncAfter(deadline: .now() + delay, execute: workItem!)
  }
}
Testing debouncing with Inverted expectation
To test Debouncer we can use XCTest expectation in inverted mode. Read more about it in Unit testing asynchronous Swift code.
To check that a situation does not occur during testing, create an expectation that is fulfilled when the unexpected situation occurs, and set its isInverted property to true. Your test will fail immediately if the inverted expectation is fulfilled.
class DebouncerTests: XCTestCase {
  func testDebouncing() {
    let cancelExpectation = self.expectation(description: "cancel")
    cancelExpectation.isInverted = true

let completeExpectation = self.expectation(description: "complete")
    let debouncer = Debouncer(delay: 0.3)

debouncer.schedule {
      cancelExpectation.fulfill()
    }

debouncer.schedule {
      completeExpectation.fulfill()
    }

wait(for: [cancelExpectation, completeExpectation], timeout: 1)
  }
}
Testing user interface with UITests
Sometimes small refactoring can have a large effect. A disabled button can lead to unusable screens afterward. UITest helps ensuring integrity and functional aspects of the app. Test should be declarative. We can use the Robot pattern.
class RecipesUITests: XCTestCase {
  var app: XCUIApplication!

  override func setUp() {
    super.setUp()
    continueAfterFailure = false

    app = XCUIApplication()
  }

  func testScrolling() {
    app.launch()

    let collectionView = app.collectionViews.element(boundBy: 0)
    collectionView.swipeUp()
    collectionView.swipeUp()
  }

  func testGoToDetail() {
    app.launch()

    let collectionView = app.collectionViews.element(boundBy: 0)
    let firstCell = collectionView.cells.element(boundBy: 0)
    firstCell.tap()
  }
}
Here are some of my articles regarding testing.
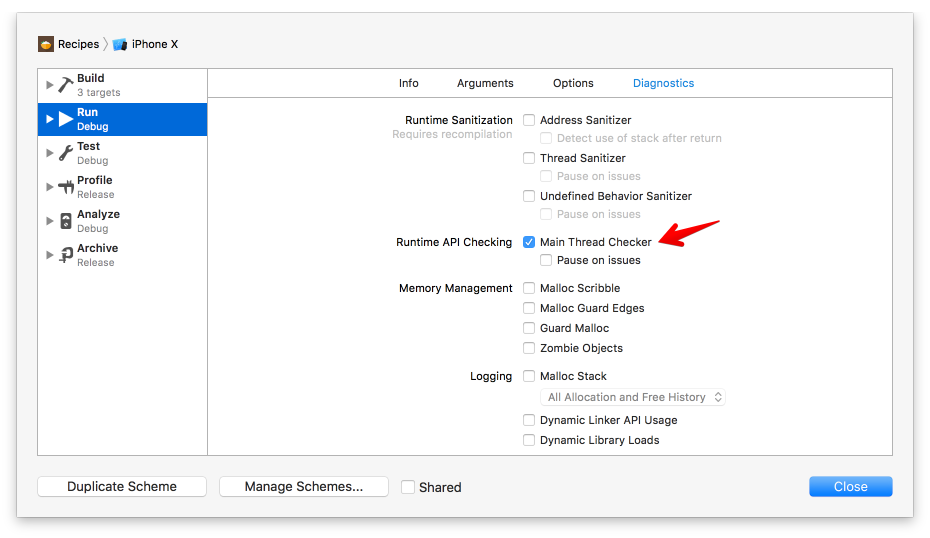
Main thread guard
Accessing the UI from the background queue can lead to potential problems. Earlier, I needed to use MainThreadGuard, now that Xcode 9 has Main Thread Checker, I just enabled that in Xcode.
The Main Thread Checker is a standalone tool for Swift and C languages that detects invalid usage of AppKit, UIKit, and other APIs on a background thread. Updating UI on a thread other than the main thread is a common mistake that can result in missed UI updates, visual defects, data corruptions, and crashes.
Measuring performances and issues
We can use Instruments to thoroughly profile the app. For quick measurement, we can head over to the Debug Navigator tab and see CPU, Memory and Network usage. Check out this cool article to learn more about instruments.
Prototyping with Playground
Playground is the recommended way to prototype and build apps. At WWDC 2018, Apple introduced Create ML which supports Playground to train model. Check out this cool article to learn more about playground driven development in Swift.
Where to go from here
Thanks for making it this far. I hope you’ve learnt something useful. The best way to learn something is to just do it. If you happen to write the same code again and again, make it as a component. If a problem gives you a hard time, write about it. Share your experience with the world, you will learn a lot.
Original post https://medium.freecodecamp.org/learn-ios-best-practices-by-building-a-simple-recipes-app-9bcbce4d10d
Start the conversation